Construction Catalogue
Unit Parts
This category houses all of the building blocks you would find within each individual unit of a multiplex.
Use the side navigation panel or click on any of the icons below to access the respective plan drawings, sizing guidelines, tips & tricks, and pricing suggestions!

Kitchen

4-Piece Bathroom

3-Piece Bathroom

Half Bathroom

Accessible Bathroom

In-Unit Laundry

Bedroom
Kitchen
Kitchens can be the heart of the home. With both plumbing and electrical requirements, they can be one of the more complicated components for construction. Check out two common kitchen configurations below and some tips and tricks for your design and installation.
Tips & Tricks:
Where should your kitchen be located?
Locating your kitchen
If you have an existing kitchen or bathroom, use it! Using existing locations or fixtures for plumbing within your multiplex will save you money and headaches.
Locating your plumbing
Where possible locate your plumbing fixtures (sinks, dishwashers, washers, toilets, baths, showers) at interior walls. Build this wall using wood studs so you can fit your pipes in it. If a layout works best on the exterior you will need to build an insulated partition inside, against the exterior wall so you can run the pipes in a cavity that won't freeze. Remove any existing lath and plaster and frame a 2x4 stud wall against the exterior to accommodate your new plumbing.
Appliances
Plan for plugs
Where you have appliances like dishwashers, fridges and stoves you need to allow room at the back for hookups and plugs. These can’t be pushed right against the wall. Check the appliance manuals for each appliance in your kitchen to identify where these are and recommended spacing.
Leave room for your appliances
Things like fridges need 2” - 3” between the door and wall to be able to fully open.
Size your appliances to your household’s needs
If you have a large family, or many individuals living together, consider getting a large fridge so that you can buy groceries in bulk. Additionally, small appliances don’t fit standard cookware and can be more expensive than standard sizes.
Ventilation
Vent your stove to the outside, rather than using a recirculating ventilation hood if possible.
Ground your outlets in the kitchen, especially in wet areas such as the sink.
Galley Kitchen
A galley kitchen is a narrow, efficient layout where counters and appliances are positioned along a single wall. These types of kitchens are ideal for maximizing space in new housing with limited floor area.
What is included?
Appliances:
(1) Refrigerator / Freezer
(1) Range
(1) Dishwasher
(1) Microwave
(1) Vent hood - vented to exterior
Millwork:
Assume particle board with melamine finish. Sheet taped edge
Counter top
Upper cabinets
Lower cabinets
Backsplash
Hardware
Electrical:
Provide electrical for all appliances as required
Provide a minimum of two outlets above the counter (GFCI)
Lighting:
Under cabinet lighting
Upper cabinet lighting
Ceiling lighting
Plumbing Fixtures:
(1) Sink Basin
(1) Faucet
(1) Sink Trap
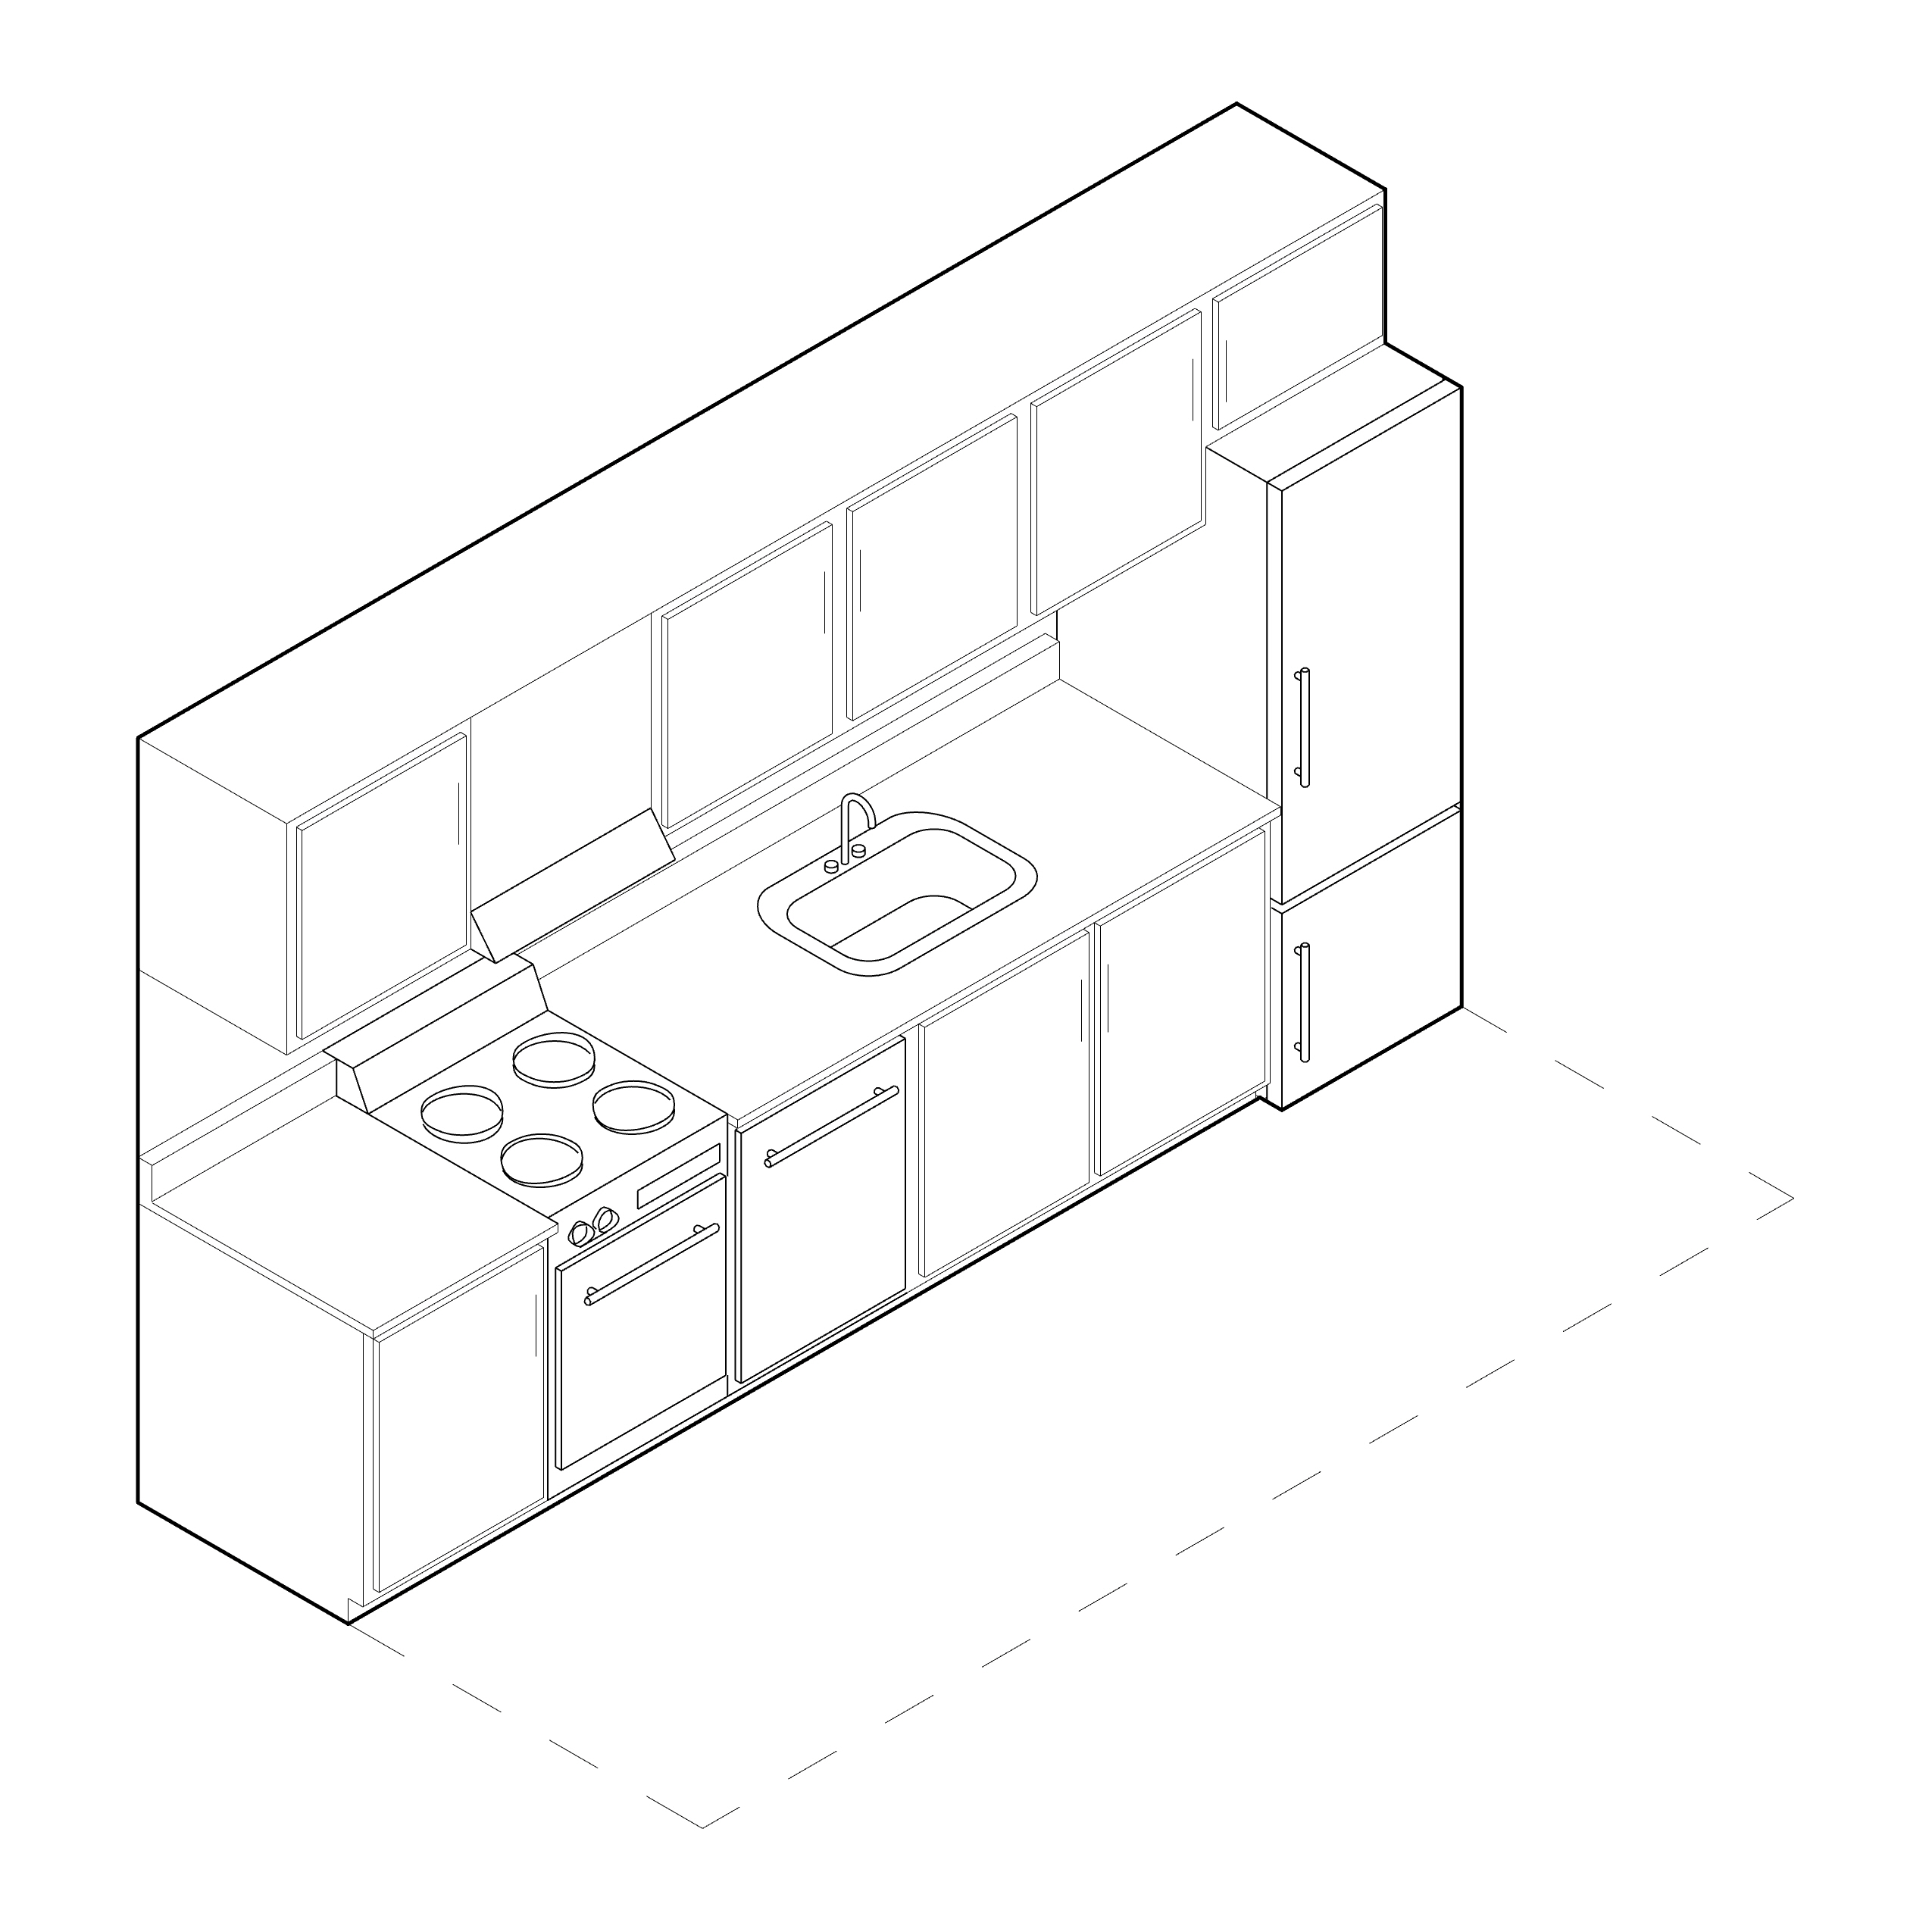
3D view of a galley kitchen

Floor plan of a galley kitchen
|
Standard Kitchen Dimensions Make sure you leave enough space to walk in and around your kitchen. We recommend leaving a
minimum
of 3’-0” clear in front of your kitchen. Increasing this dimension to 4 ft will give you a more generous working space.
|
Galley Kitchen + Island
kitchen with an island resembles a galley layout but includes a freestanding additional counter space. This design amplifies functionality by providing extra workspace and storage, catering to improved kitchen usability for users.
What is included?
Appliances:
(1) Refrigerator / Freezer
(1) Refrigerator / Freezer
(1) Range
(1) Dishwasher
(1) Microwave
(1) Vent hood - vented to exterior
Millwork:
Assume particle board with melamine finish. Sheet taped edge
Counter top
Upper cabinets
Lower cabinets
Kitchen island
Backsplash
Hardware
Electrical:
Provide electrical for all appliances as required
Provide a minimum of two outlets above the counter (GFCI)
Lighting:
Under cabinet lighting
Upper cabinet lighting
Ceiling lighting
Plumbing Fixtures:
(1) Sink Basin
(1) Faucet
(1) Sink Trap
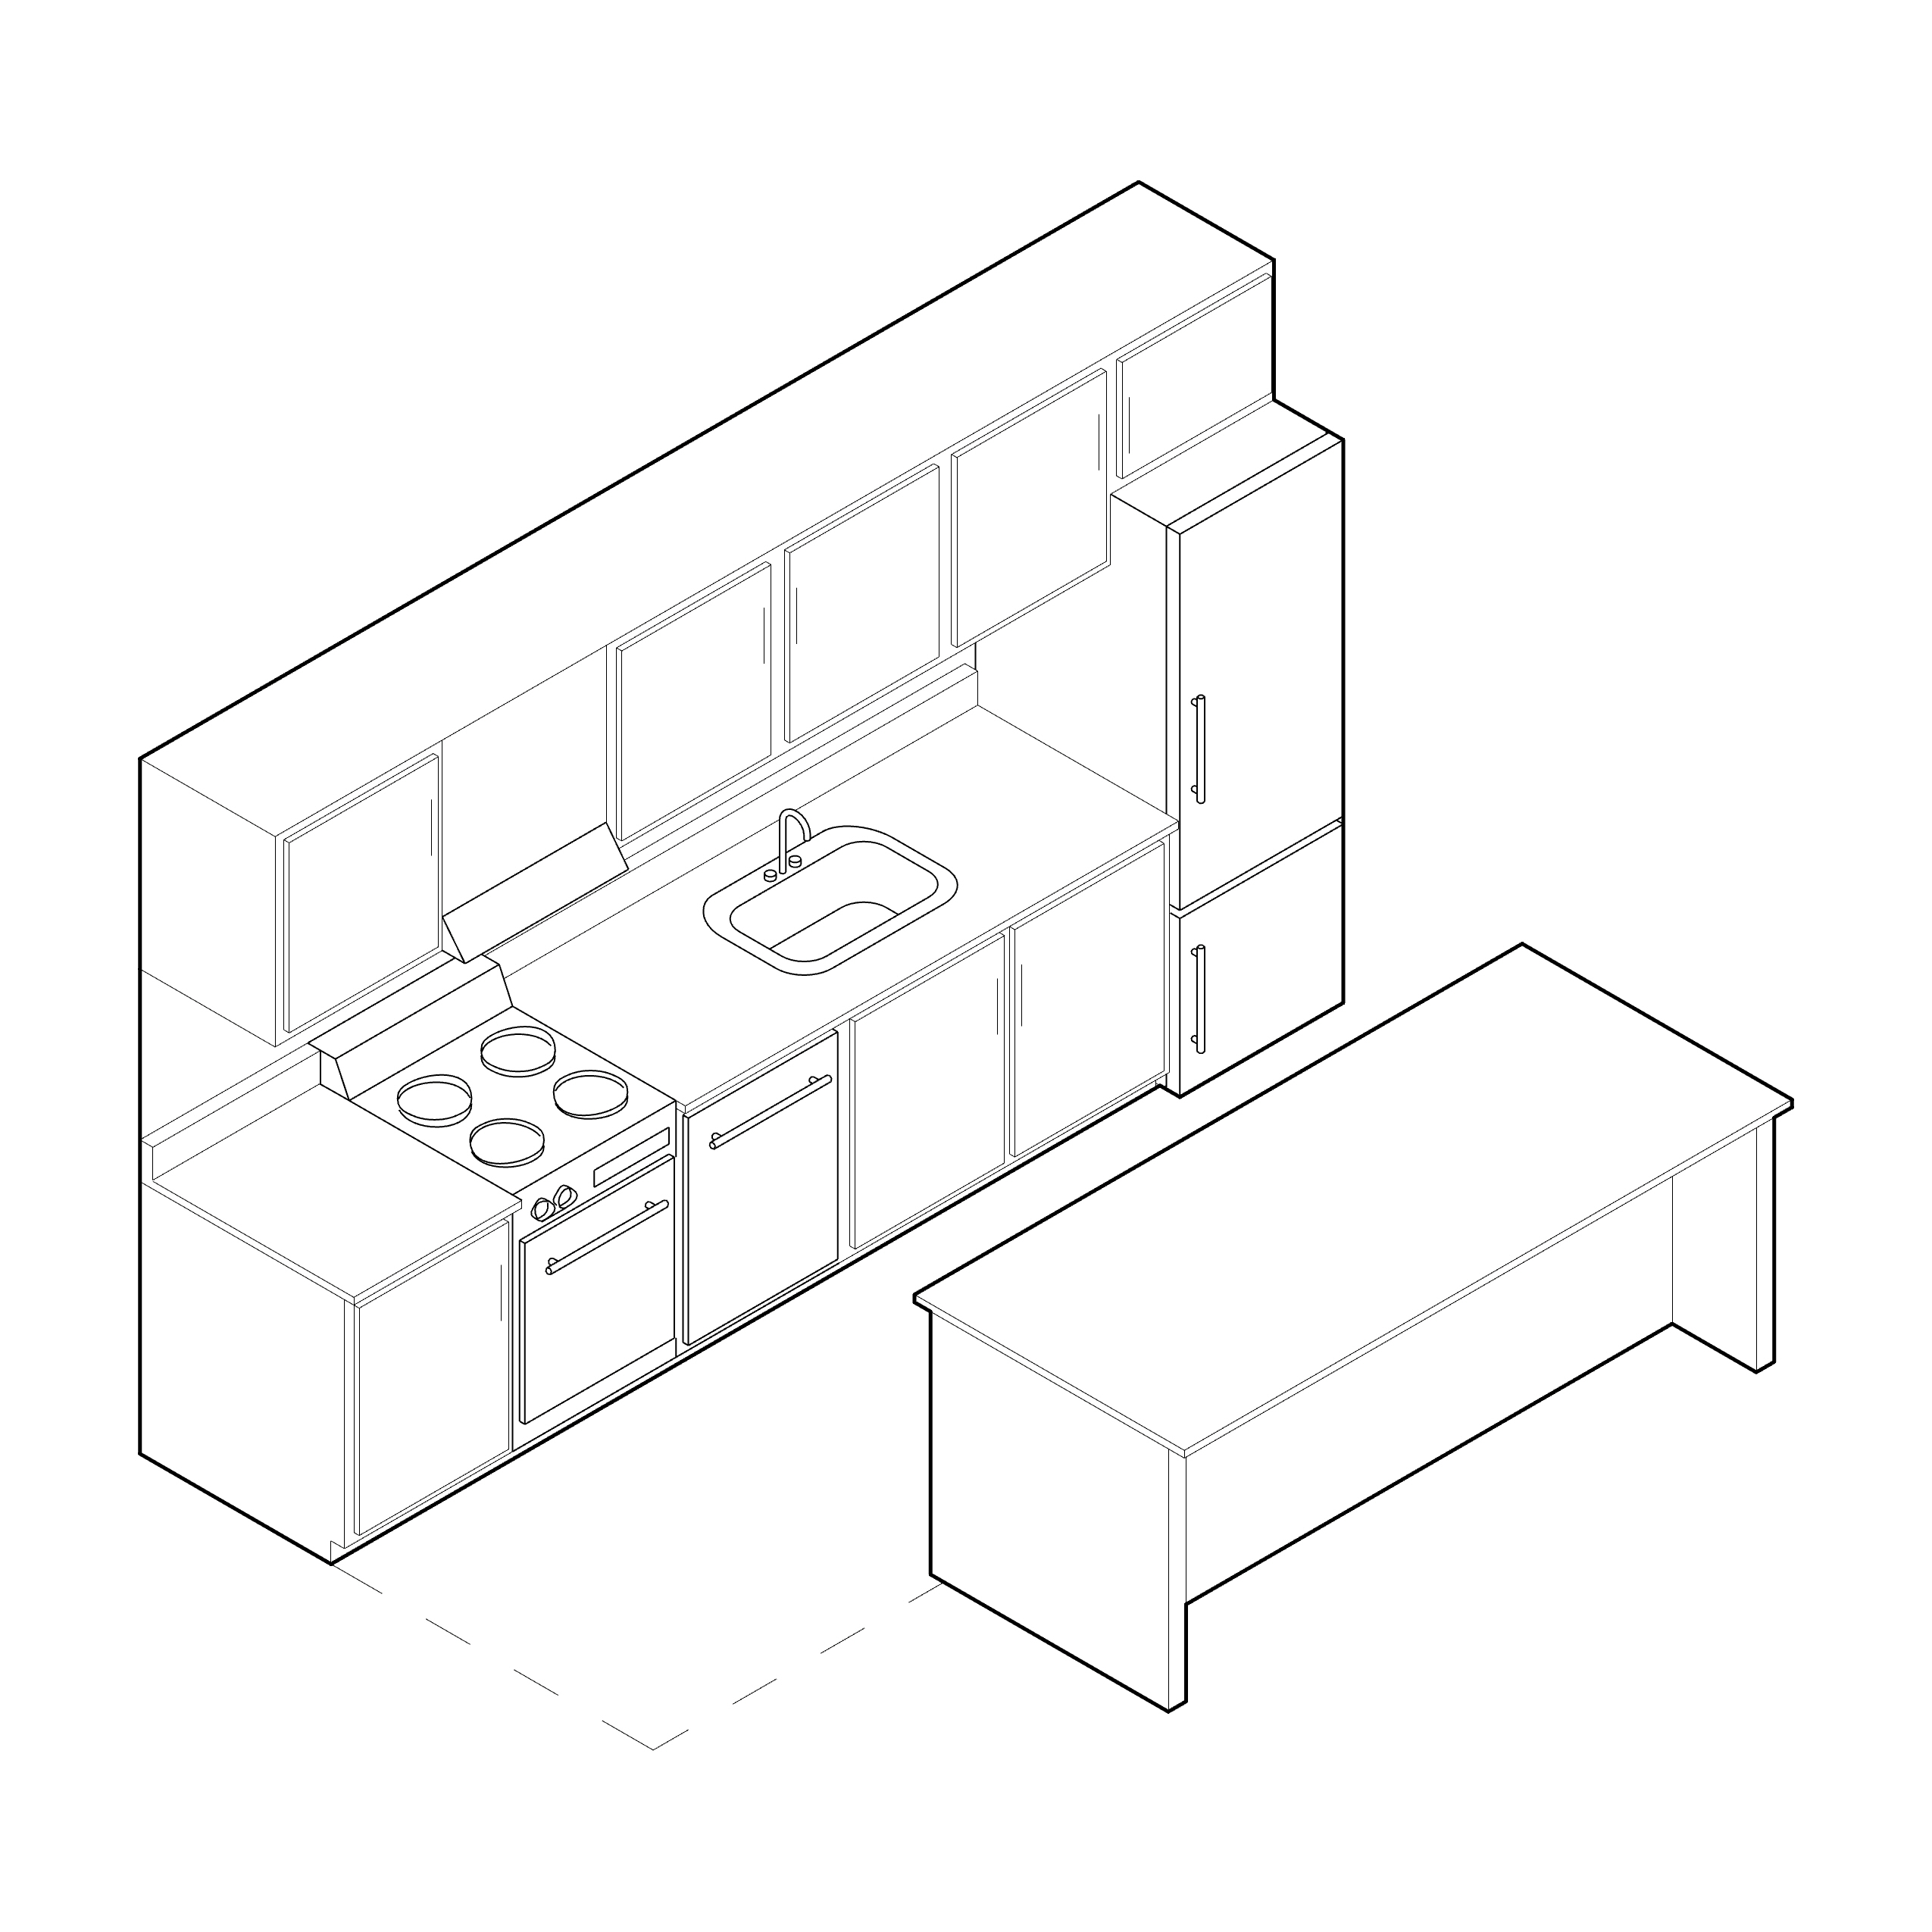
3D view of a kitchen with island

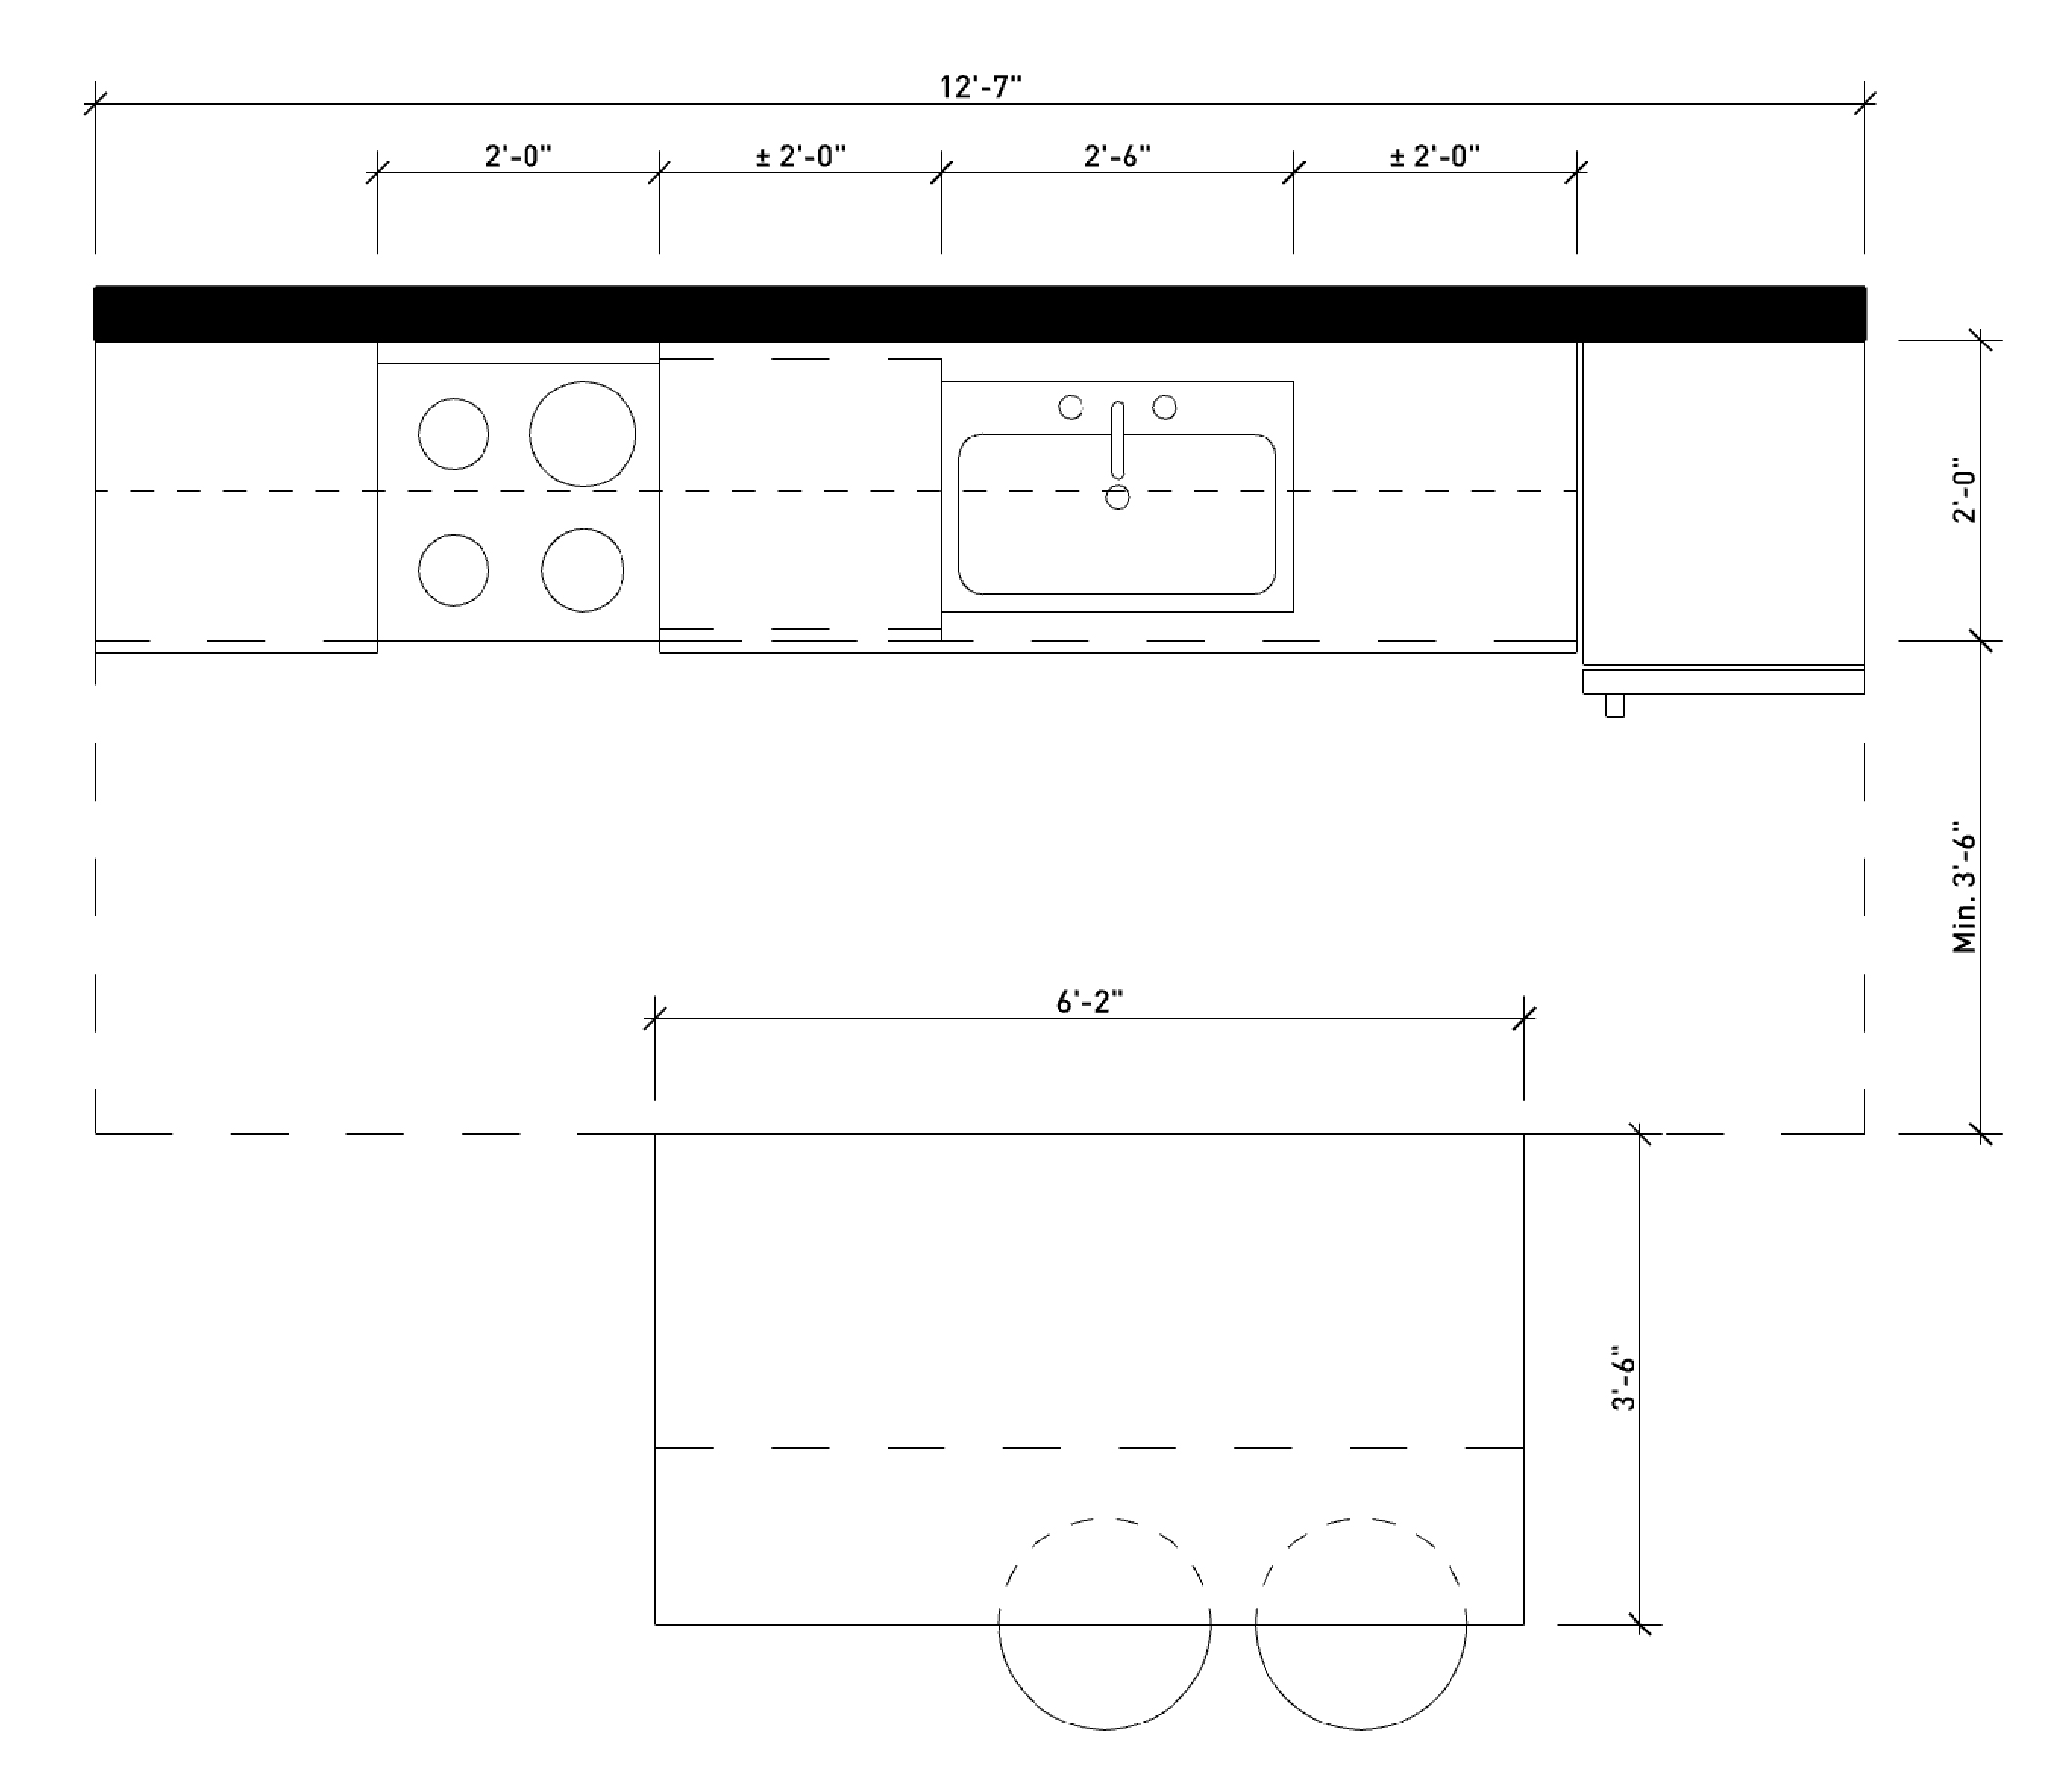
Floor plan of a kitchen with island
Standard Kitchen Dimensions
Kitchen islands are great at providing additional countertop and storage space for your kitchen, improving its functionality. Make sure there is clear space around the island so you are able to walk around it. We recommend maintaining 3’-6” of clear space between your kitchen counter and kitchen island.
Islands come in many shapes and sizes - this one is sized using a standard ikea island countertop.
If your island is fixed in place, you should provide outlets to allow other small appliances to be powered (toasters, blenders, etc.)
Bathrooms

Bathroom configurations vary widely, adapting to your available square footage. Delve into the next section to explore options and costs, empowering you to make informed choices for your project.
Tips & Tricks:
Where should your bathroom be located?
Locating your bathroom
If you have an existing bathroom, use it! Using existing locations or fixtures for plumbing within your multiplex will save you money and headaches.
Locating your Plumbing
Where possible locate your plumbing fixtures (sinks, dishwashers, washers, toilets, baths, showers) at interior walls. Build this wall using 2x6 wood stud so you can fit your pipes in it. If a layout works best on the exterior you will need to build an insulated partition inside, against the exterior wall so you can run the pipes in a cavity that won't freeze. Remove any existing lath and plaster and frame a 2x4 stud wall against the exterior to accommodate your new plumbing.
Bathroom Doors
Try to locate bathroom doors off corridors rather than main rooms. This increases privacy when using the bathroom.
Plumbing Fixtures
Toilets
An insulated toilet will help you avoid condensation build up.
Wall mounted toilets save space, easier to clean and have less maintenance but are more expensive.
An insulated toilet will help you avoid condensation build up.
Wall mounted toilets save space, easier to clean and have less maintenance but are more expensive.
Sinks
Integrated sinks are easier to clean and have more counter space.
Tubs
Get an alcove tub with a tile flange!
Finishes
Extra tile installed behind your toilet, and as a backsplash for your sink will make cleaning easier and protect your walls from water damage.
Integrated sinks are easier to clean and have more counter space.
Tubs
Get an alcove tub with a tile flange!
Finishes
Extra tile installed behind your toilet, and as a backsplash for your sink will make cleaning easier and protect your walls from water damage.
Inside Your Walls
Insulate unwanted sounds
Using acoustic insulation around your bathroom walls will help prevent noise from being heard elsewhere in your unit.
Protect from mold and mildew
Use waterproof drywall or tile backer instead of standard drywall and mildew resistant paint.
Provide structural support for wall-hung items
Any heavy items hung off the wall such as grab rails, towel racks, shelves, cabinets, and even vanity needs structural reinforcement behind them. Make sure to install blocking in areas where you plan to hang these heavy items.
Grounded outlets in kitchens and bathrooms
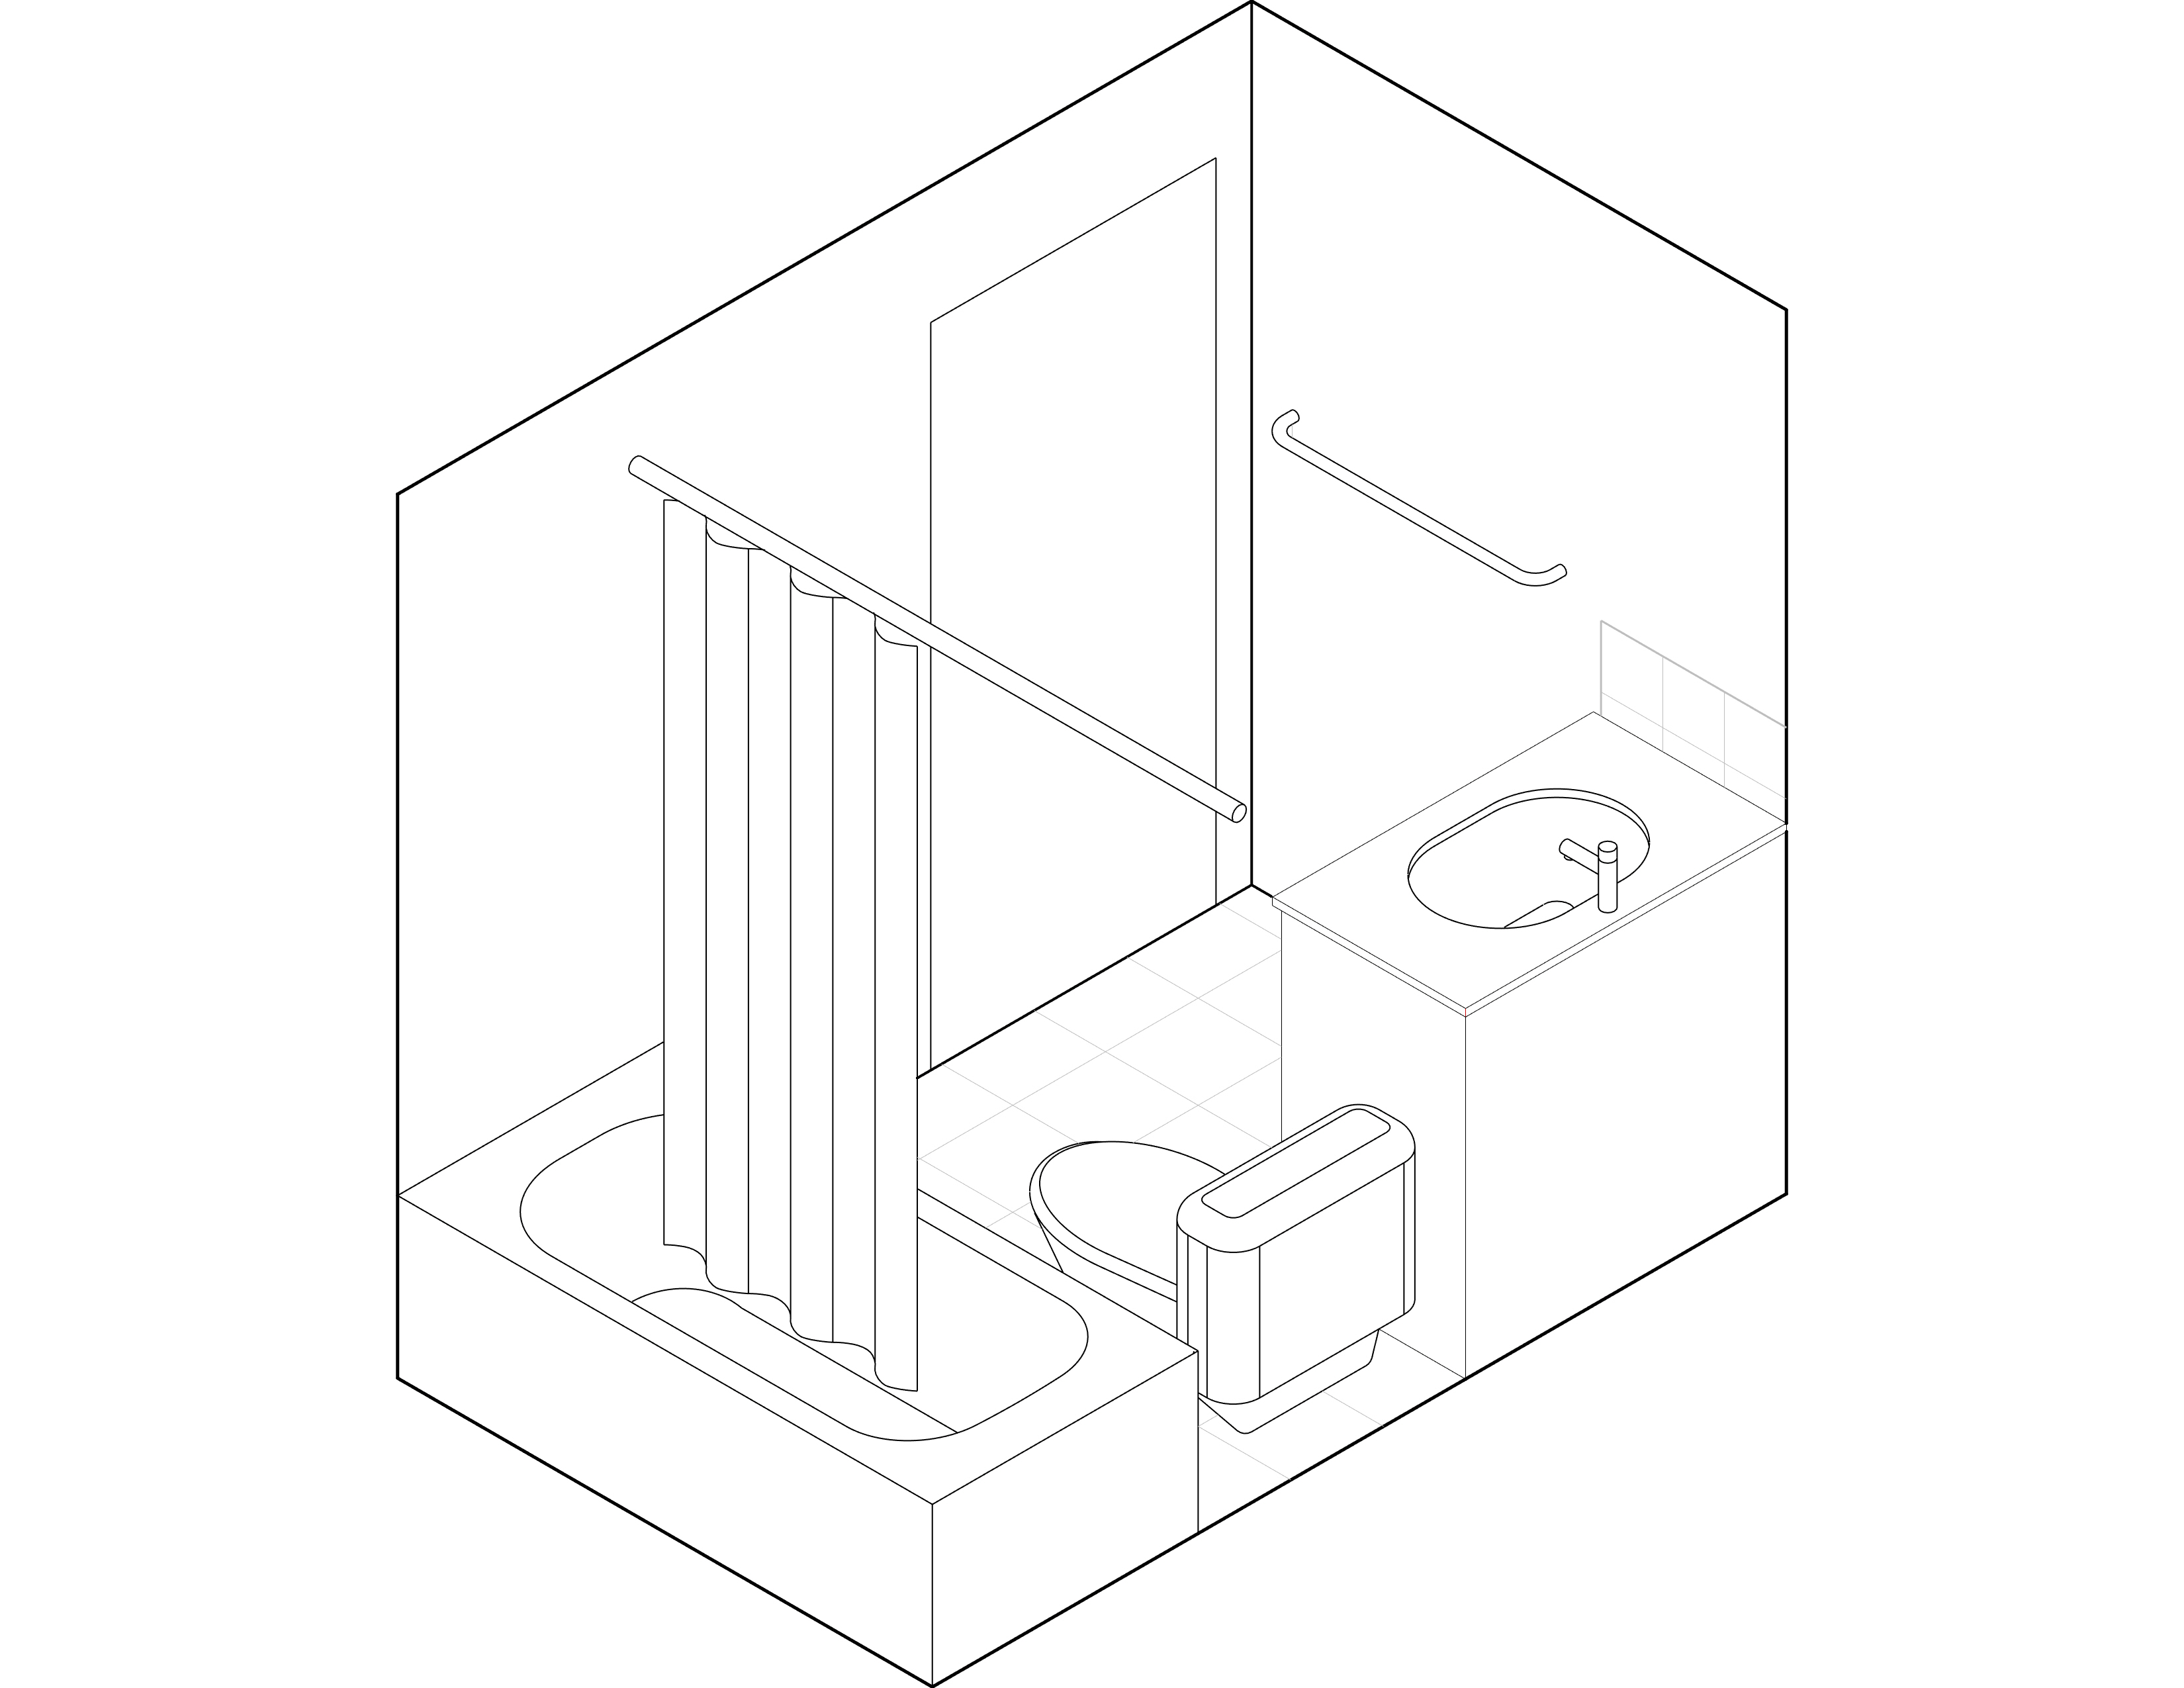
4-Piece Bathroom

4-piece bathrooms is the most common bathroom configuration. It consists of a bathtub and shower combo, toilet, and vanity with a sink.
What is included?
Plumbing Fixtures:
(1) Toilet with insulated tank
(1) Vanity with sink, trap & faucet
(1) Bathtub insert
(1) Shower set
(1) Bath filler
Accessories:
(1) Wall mounted medicine cabinet
(1) Toilet paper holder
(1) Towel bar
(1) Curtain rod
Electrical:
(1) Ventilation fan with integrated light
(1) Vanity light fixture
(2) Switches (one for overhead lighting and ventilation fan, one for vanity lighting)
(1) Outlet Above Vanity Counter (GFCI)

3D view of a 4-piece bathroom

Floor plan of a 4-piece bathroom
Standard Washroom Dimensions
5’-0” x 8’-0” is a standard and comfortable washroom size for a bathtub, toilet and vanity. Most standard tubs are designed to fit in this dimension.
Wall Construction:
(3) New wet room partition walls
(1) Interior door with waterproof drywall
(1) Interior door with trim
Finishes:
Floors: non-slip tile 27 sqft. Tiles to be installed on decoupling membrane
Walls: tile
105 sqft
$10/sqft for supply and install of tile
paint: mildew resistant paint
3D view of a 4-piece bathroom
3-Piece Bathroom

3-piece bathrooms are a good choice when you are tight on space. It consists of a shower, toilet, and vanity with a sink.
What is included?
Plumbing Fixtures:
Accessories:
(1) Wall mounted medicine cabinet
(1) Toilet paper holder
(1) Towel rod
Electrical:
(1) Toilet with insulated tank
(1) Vanity with sink, trap & faucet
(1) Shower insert
(1) Shower set
(1) Vanity with sink, trap & faucet
(1) Shower insert
(1) Shower set
Accessories:
(1) Wall mounted medicine cabinet
(1) Toilet paper holder
(1) Towel rod
Electrical:
(1) Ventilation fan with integrated light
(1) Vanity light fixture
(2) Switches (one for overhead lighting and ventilation fan, one for vanity lighting)
(1) Vanity light fixture
(2) Switches (one for overhead lighting and ventilation fan, one for vanity lighting)
(1) Outlet Above Vanity Counter (GFCI)
3D view of a 3-piece bathroom

Floor plan of a 3-piece bathroom
Wall Construction:
(3) New wet room partition walls
(1) Interior door with waterproof drywall
(1) Interior door with trim
(1) Interior door with waterproof drywall
(1) Interior door with trim
Finishes:
Floors: non-slip tile 25sqft. Tiles to be installed on decoupling membrane
Half Bathroom

A half-bathroom, or powder room only contains a toilet and a vanity with a sink.
What is included?
Plumbing Fixtures:
(1) Toilet with insulated tank
(1) Pedestal/wall mounted sink, trap & facuet
(1) Pedestal/wall mounted sink, trap & facuet
(1) Mirror
(1) Toilet paper holder
Electrical:
(1) Ventilation fan
(1) Ceiling light fixture
(1) Vanity light fixture
(2) Switches (one for ceiling lighting and ventilation fan, one for vanity lighting)
(1) Outlet Above Vanity Counter (GFCI)
(1) Ceiling light fixture
(1) Vanity light fixture
(2) Switches (one for ceiling lighting and ventilation fan, one for vanity lighting)
(1) Outlet Above Vanity Counter (GFCI)
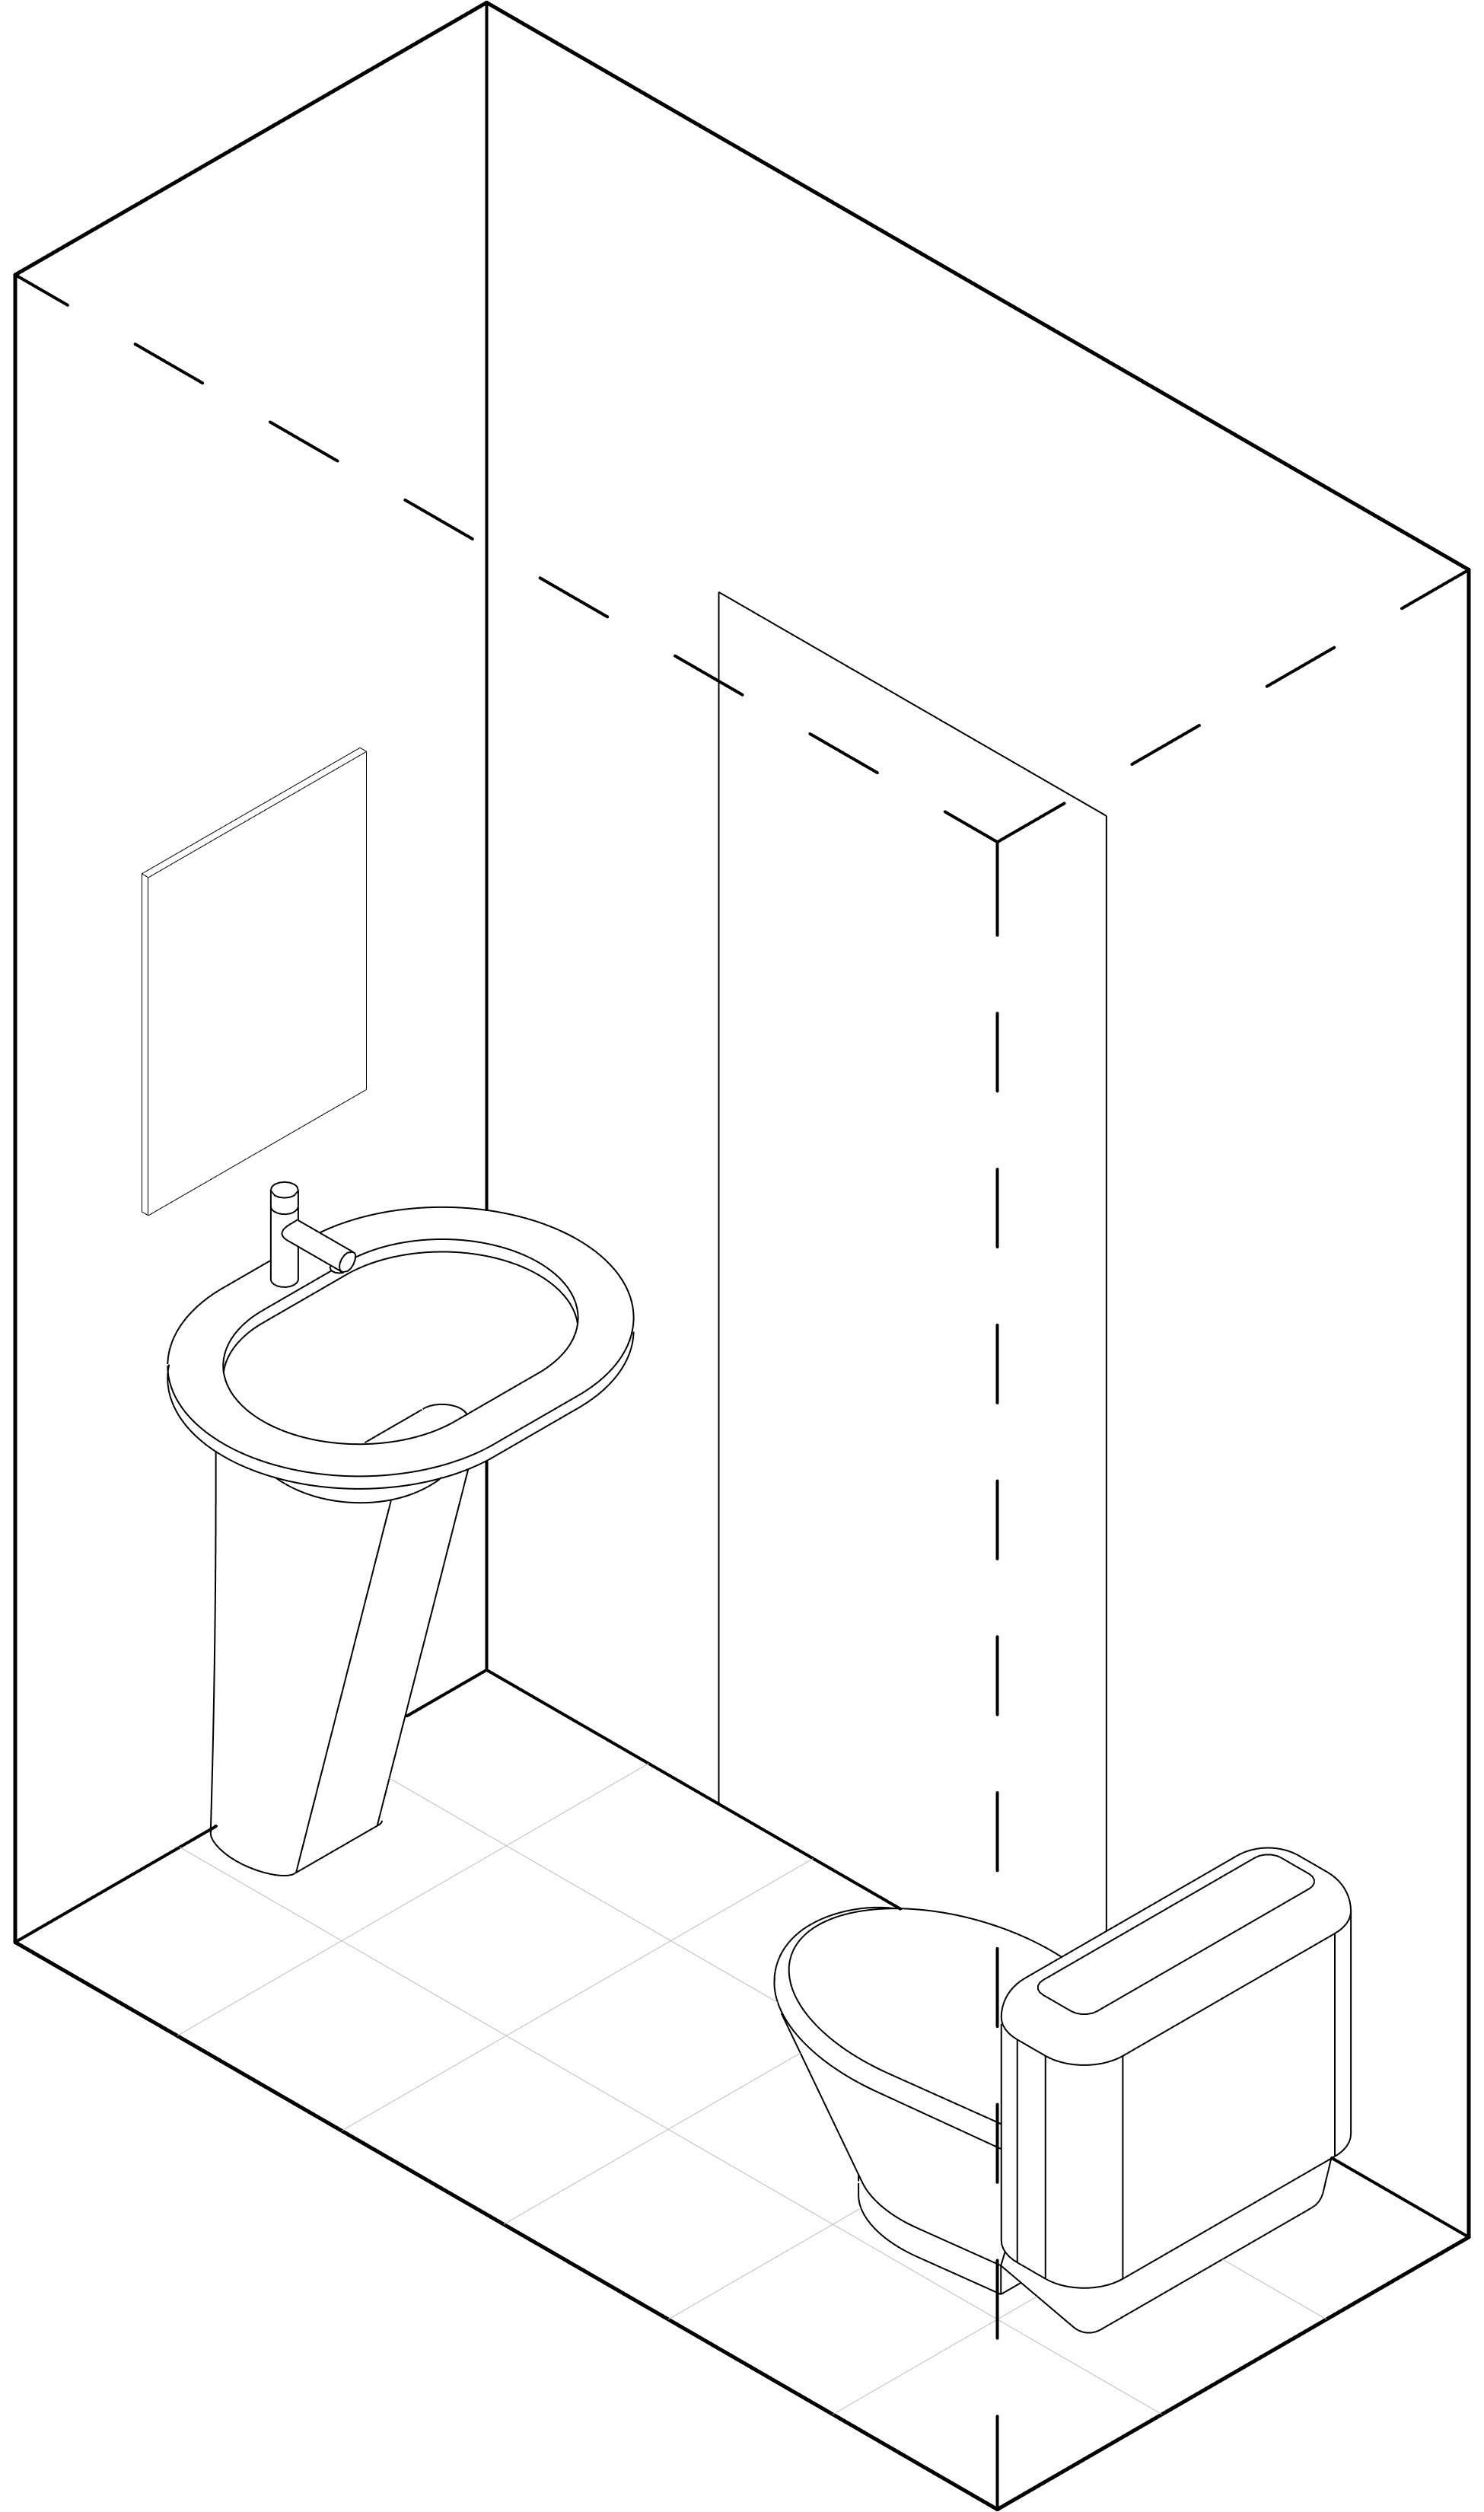
3D view of a half bathroom
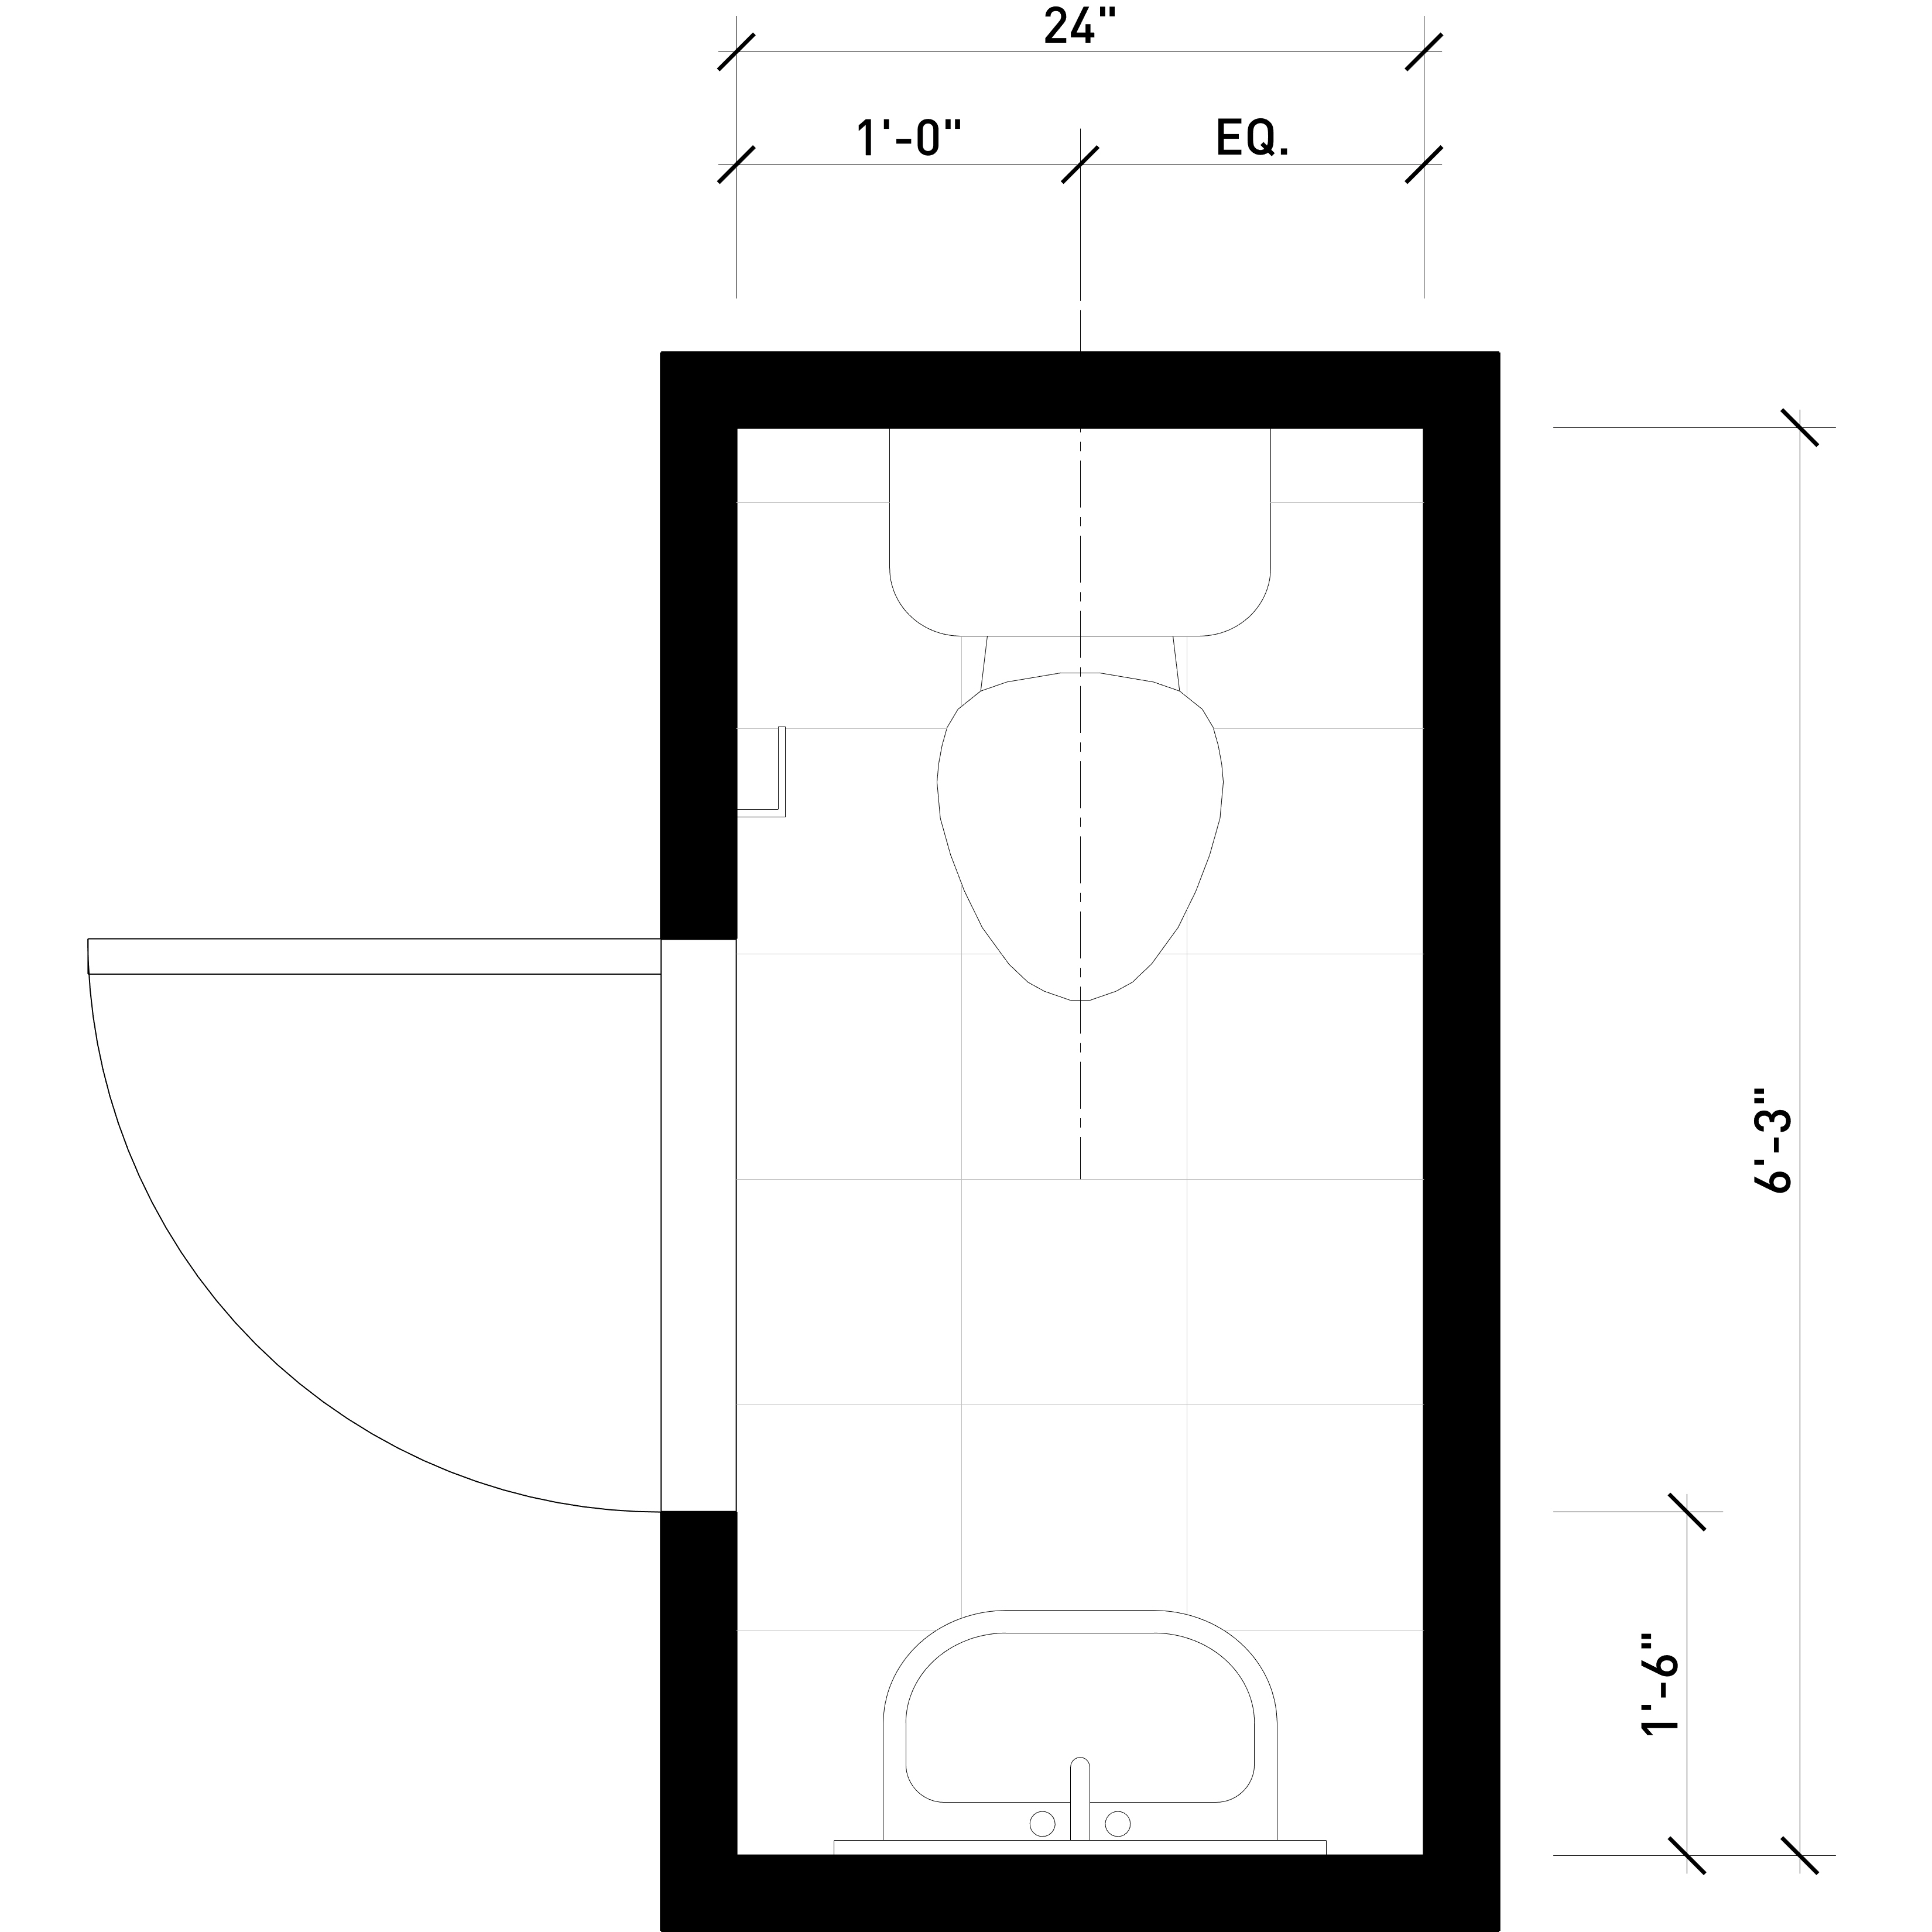
Floor plan of a half bathroom
Wall Construction:
(3) New wet room partition walls
(1) Interior swing door with waterproof drywall
(1) Interior door with trim
Finishes:
Floors: non-slip tile 12.5 sqft. Tiles to be installed on decoupling membrane
$10/sqft for supply and install of tile
Walls: mildew resistant paint
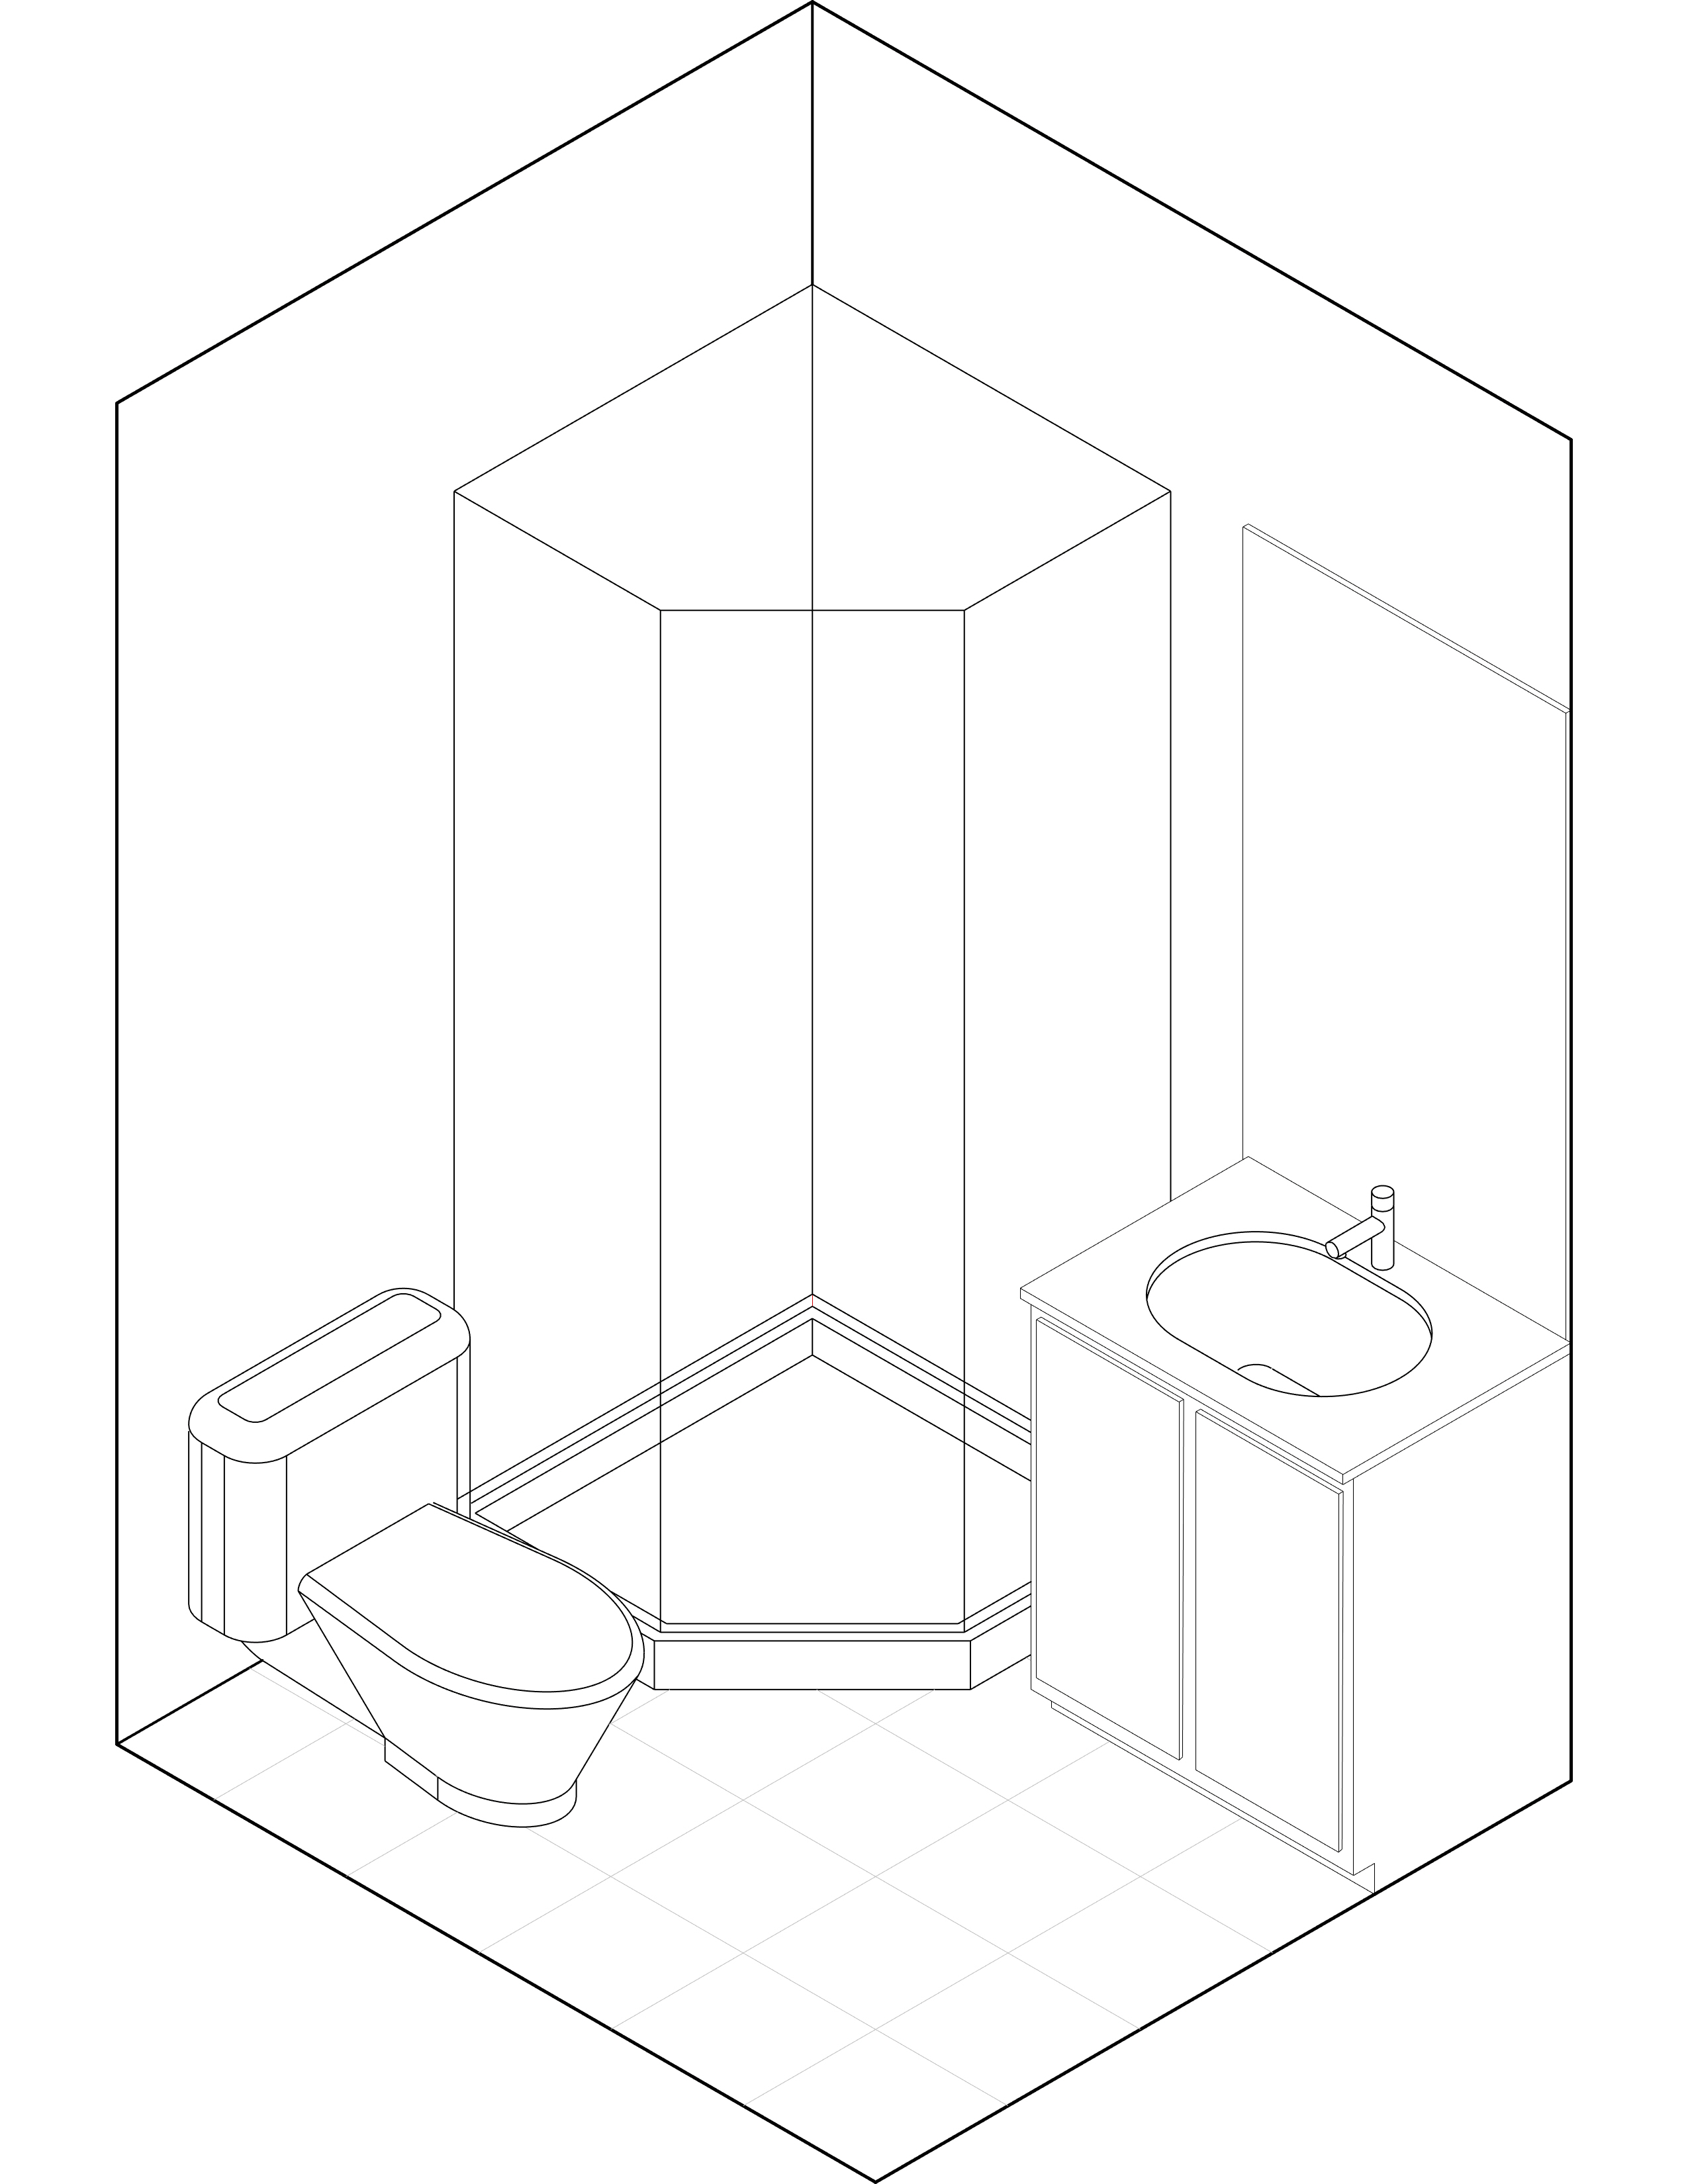
Accessible Bathroom

Universal accessible bathrooms prioritize the needs of individuals with mobility impairment, featuring a wet room layout with a seamless, step-free shower. Grab rails are placed strategically to aid the user, and fixtures such as toilets and sinks can accommodate wheelchair users. These bathrooms offer additional space to accommodate mobility devices and users comfortably.
What is included?
Plumbing Fixtures:
(1) Accessible toilet with insulated tank
(1) Accessible vanity with sink, trap & faucet
(1) Flush linear floor drain
(1) Accessible shower set
Accessories:
(1) Mirror medicine cabinet
(1) Toilet Paper Holder
(1) Towel Bar
(1) 24” Grab Bar Behind Toilet
(1) L-Shaped Grab Bar
(1) Shower Grab Bars
Electrical:
(1) Ventilation fan with integrated light
(1) Vanity light fixture
(2) Switches (one for overhead lighting and ventilation fan, one for vanity lighting)
Provide a Minimum of 1 Outlet Above Vanity Counter (GFCI)
(1) Vanity light fixture
(2) Switches (one for overhead lighting and ventilation fan, one for vanity lighting)
Provide a Minimum of 1 Outlet Above Vanity Counter (GFCI)
Lighting:
(1) Pot Light Centered in Room
(1) Vanity Lighting Set
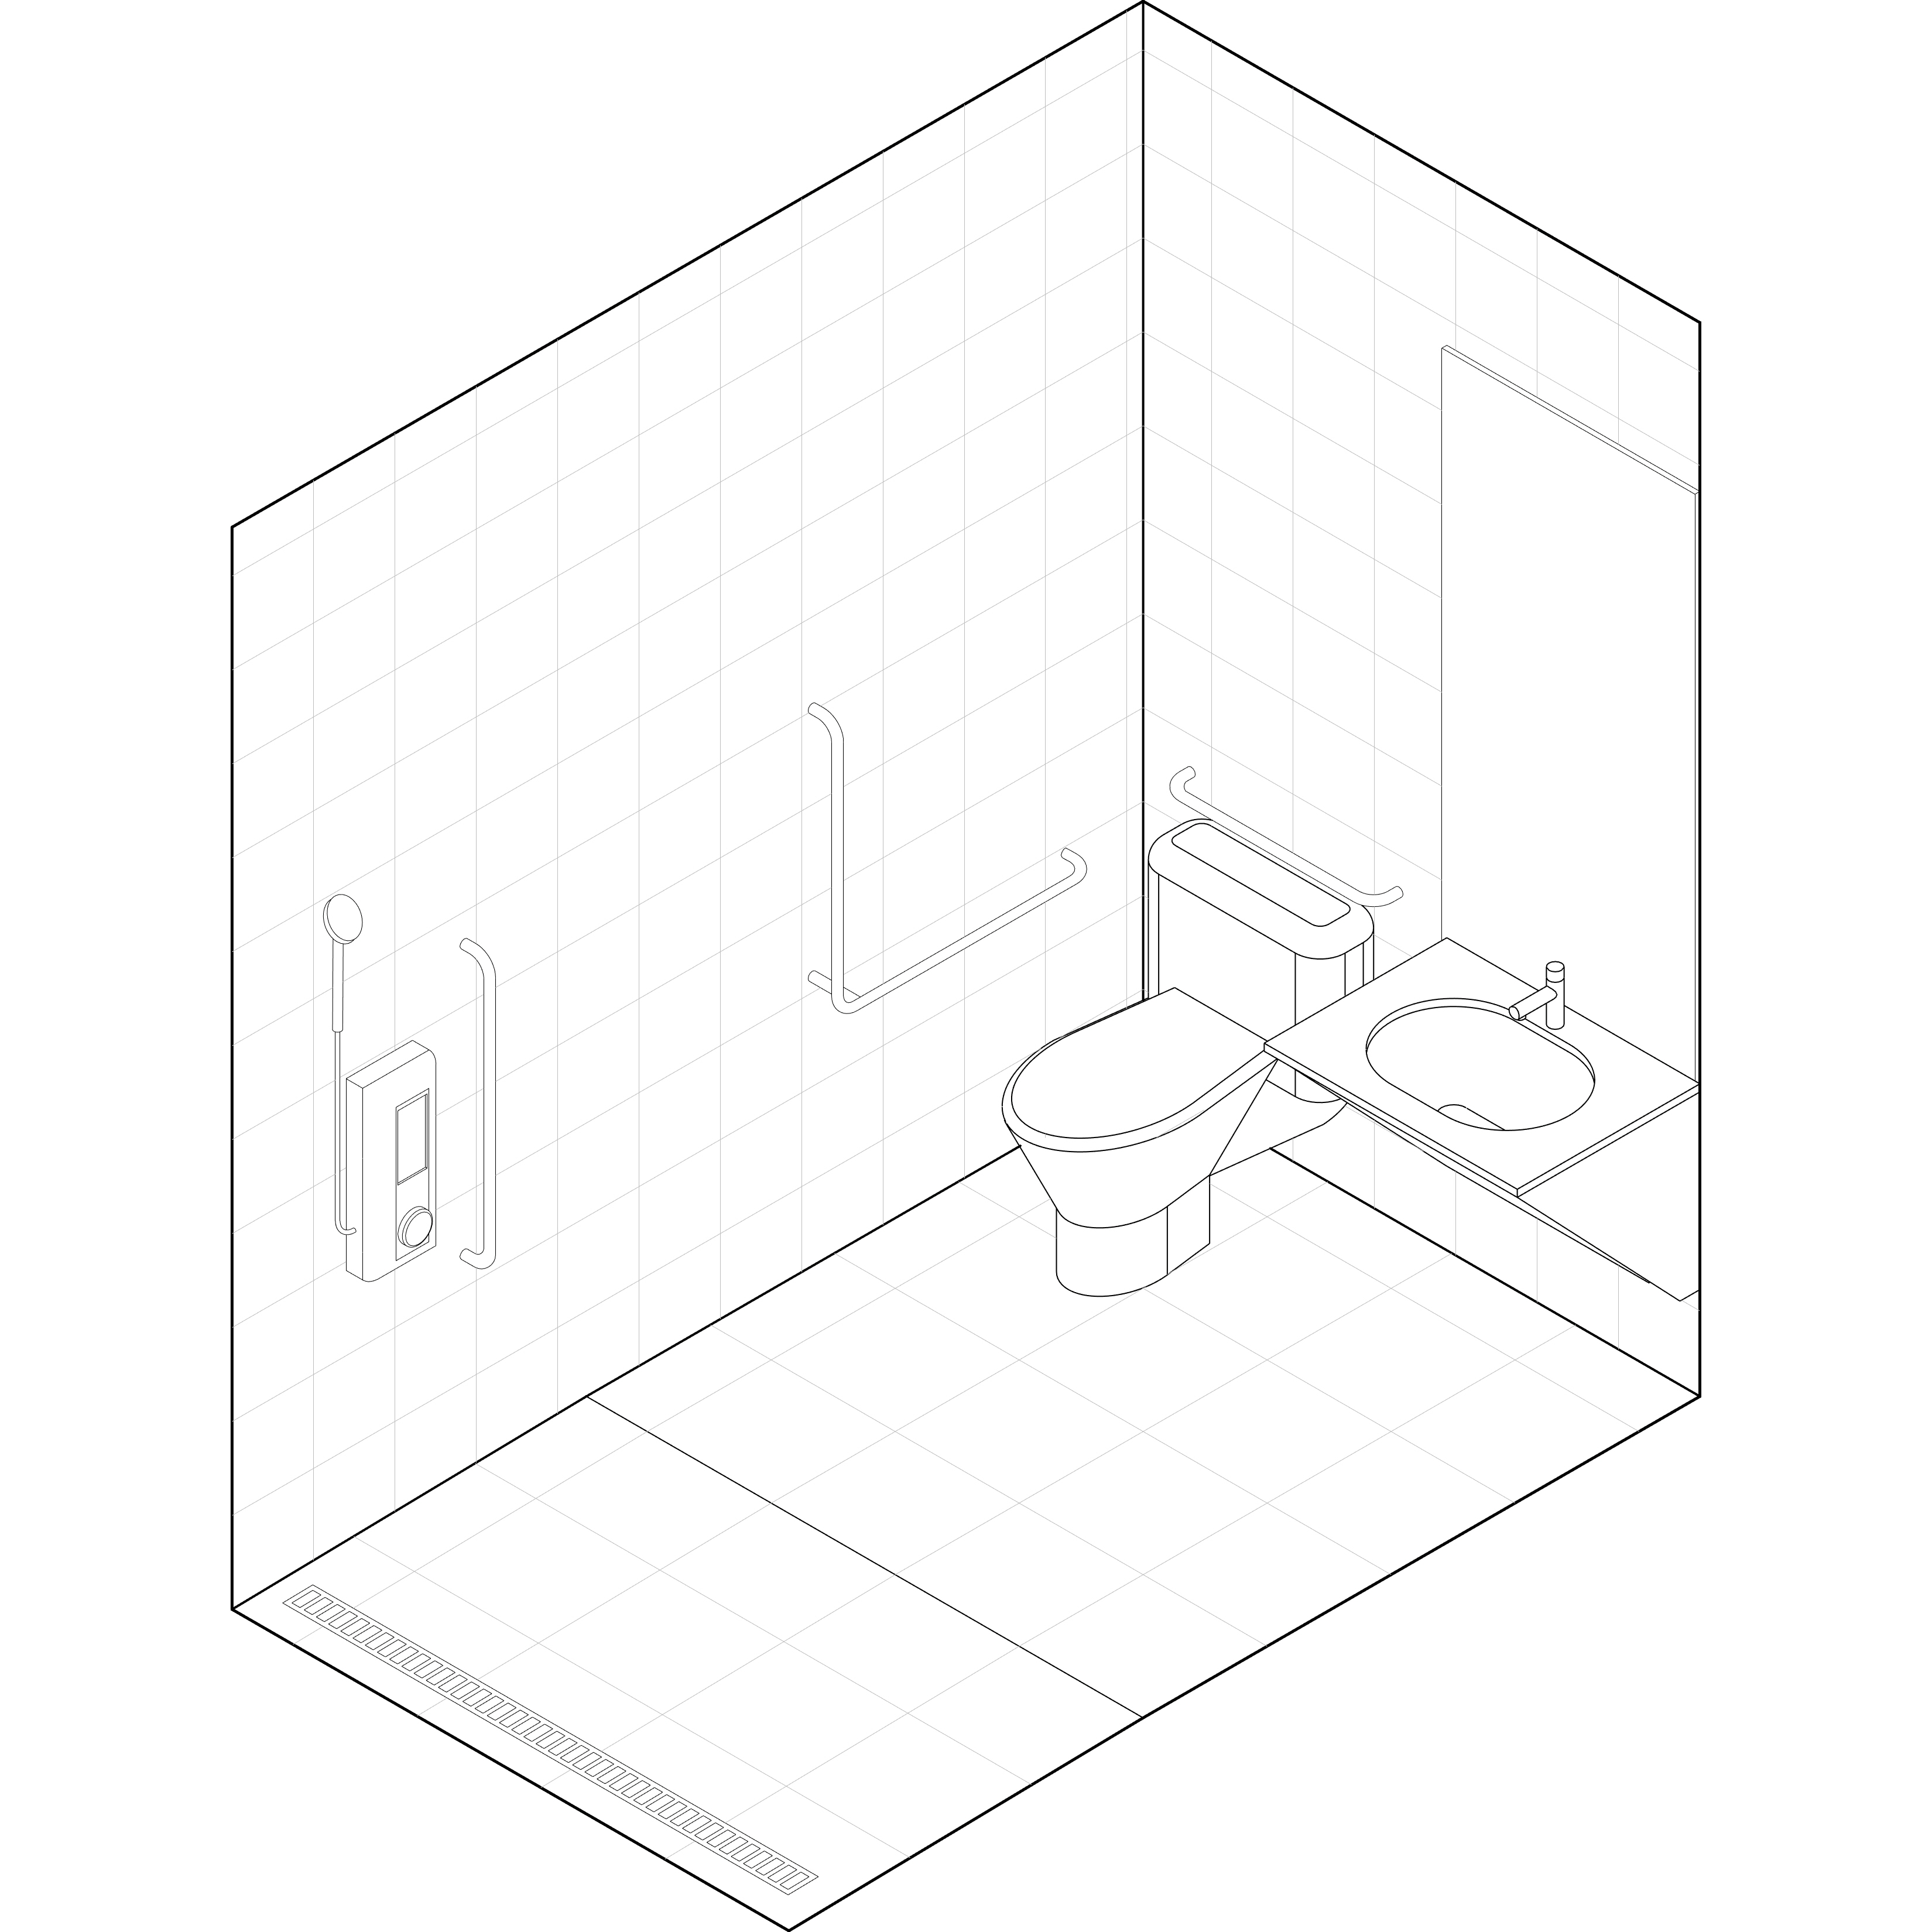
3D view of an accessible bathroom
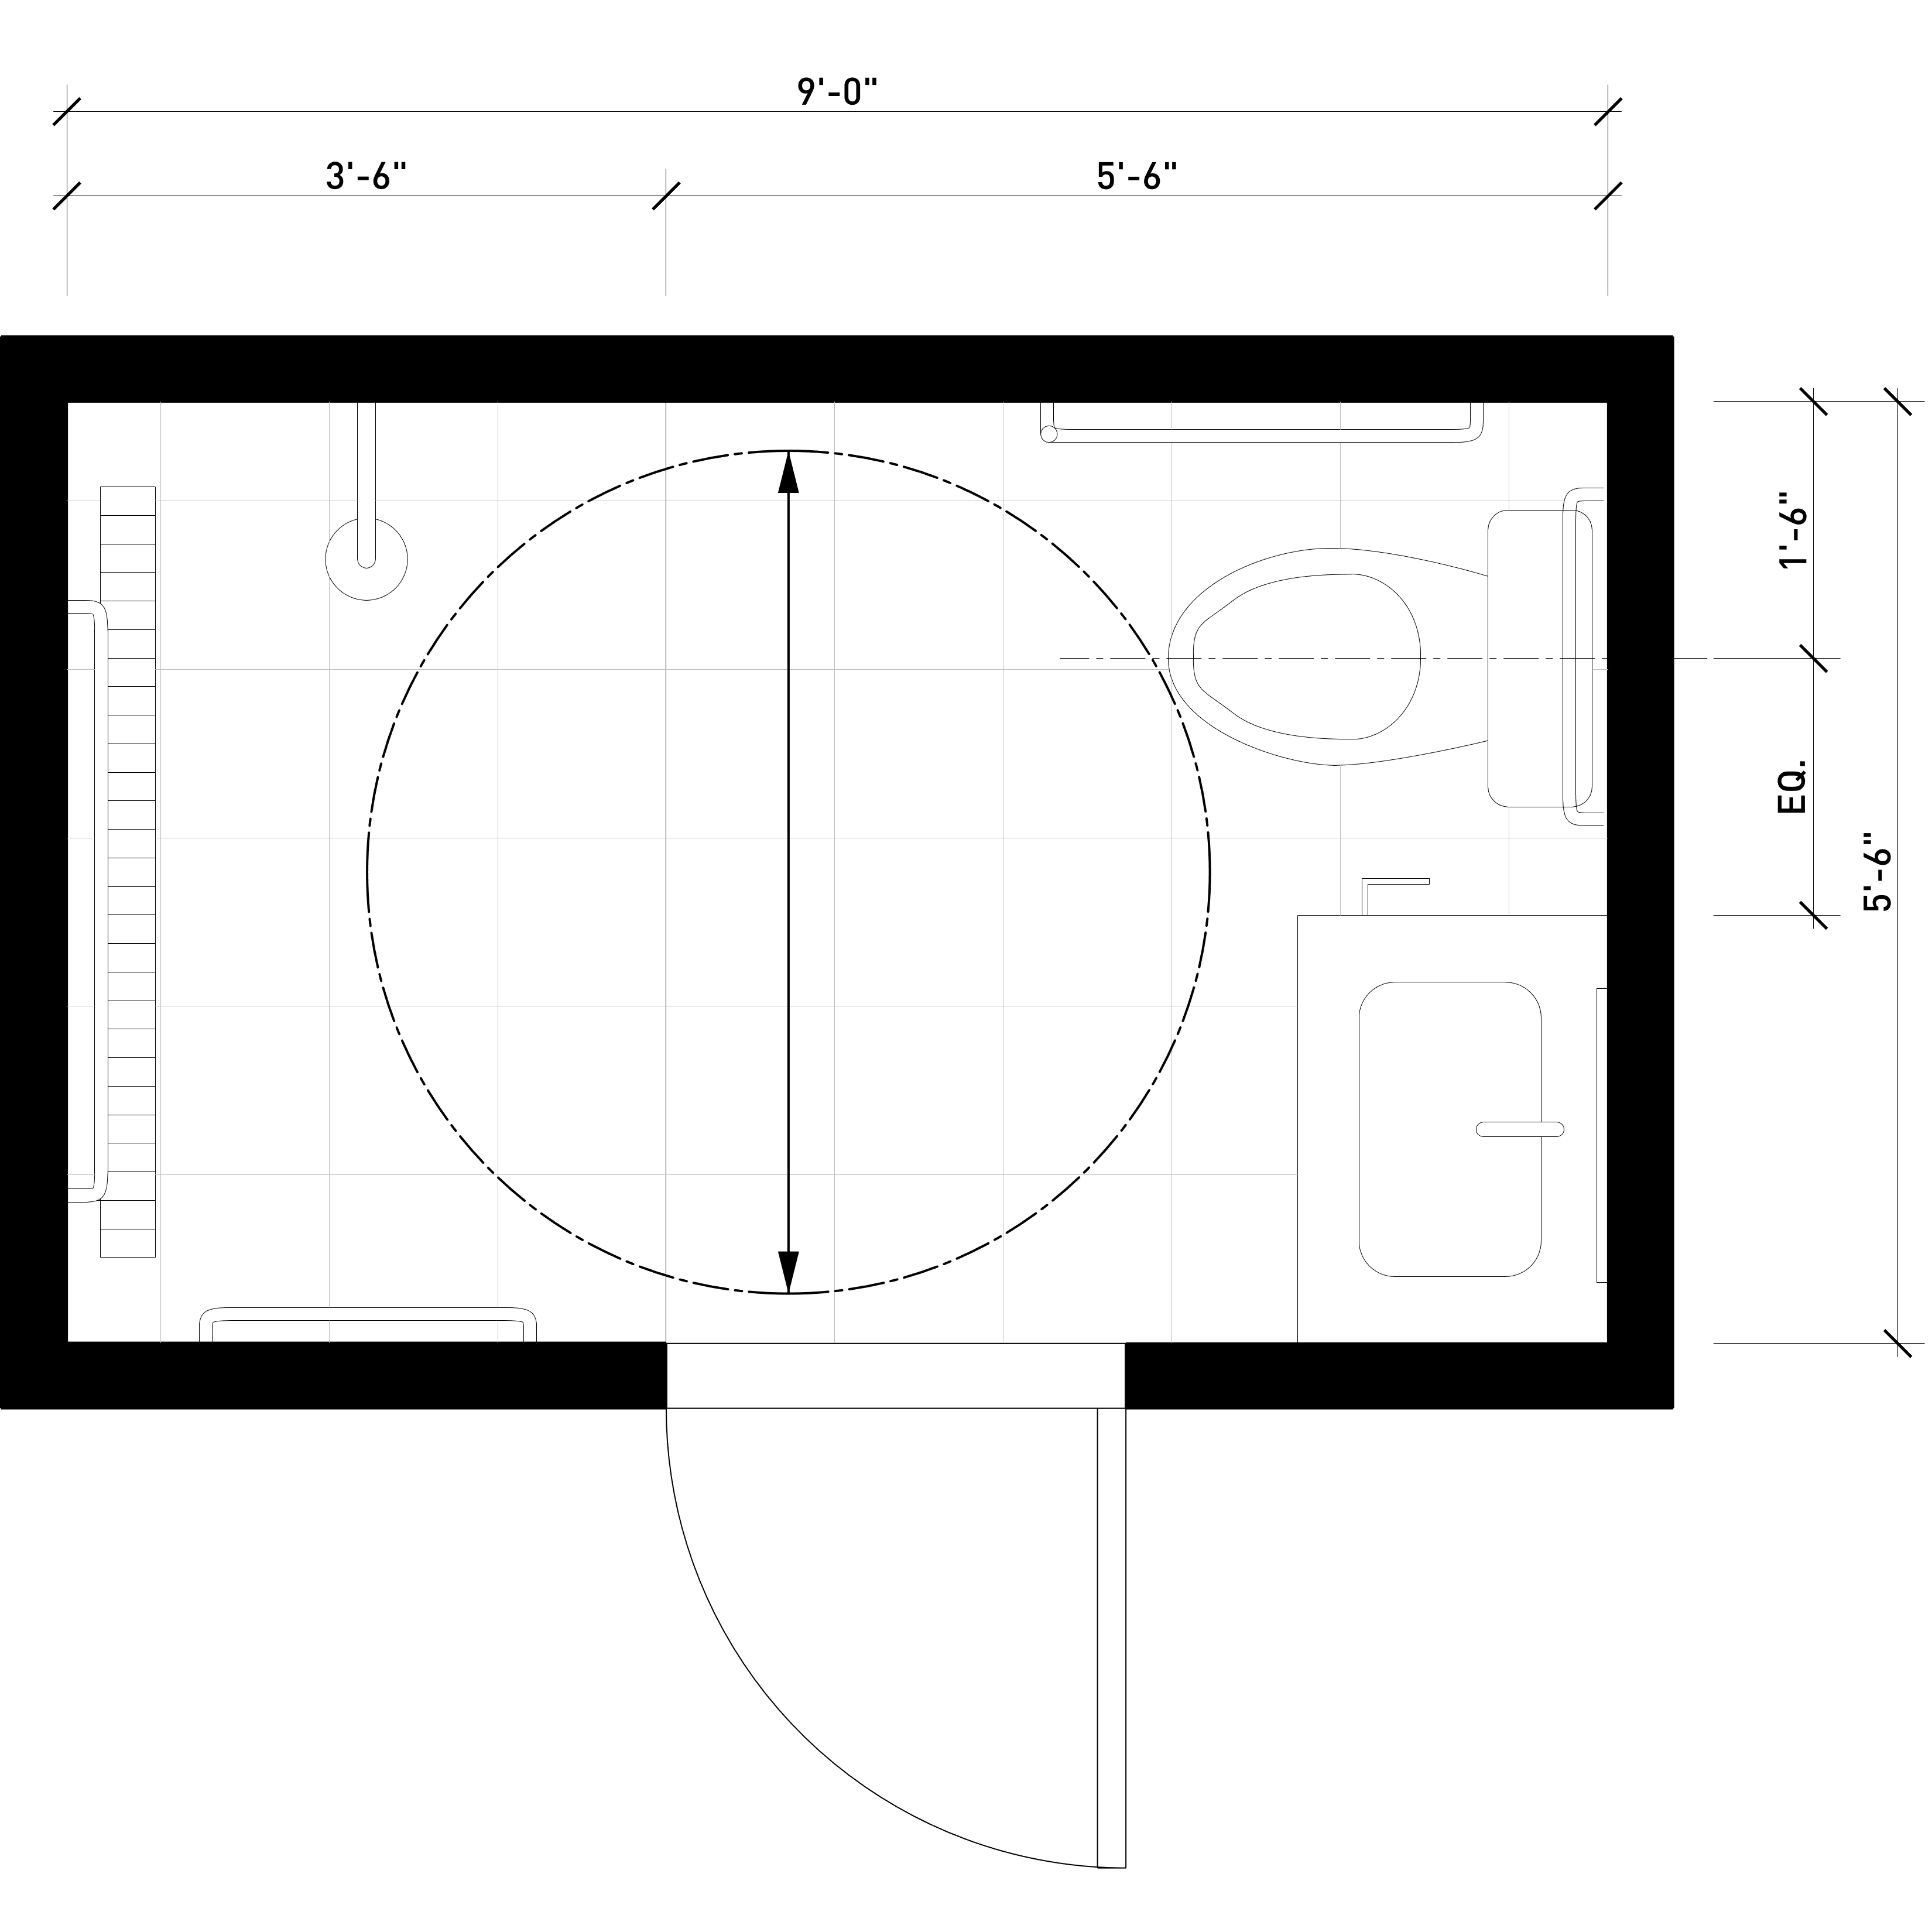
Floorplan of an accessible bathroom
Wall Construction:
(3) New wet room partition walls
(1) Interior door with waterproof drywall
(1) Interior door with trim
(1) Interior door with waterproof drywall
(1) Interior door with trim
Finishes:
Floors: non-slip tile 50 sqft. Tiles to be installed on decoupling membrane
$10/sqft for supply and install of tile
Walls: tile 90 sqft
$10/sqft for supply and install of tile
paint: mildew resistant paint
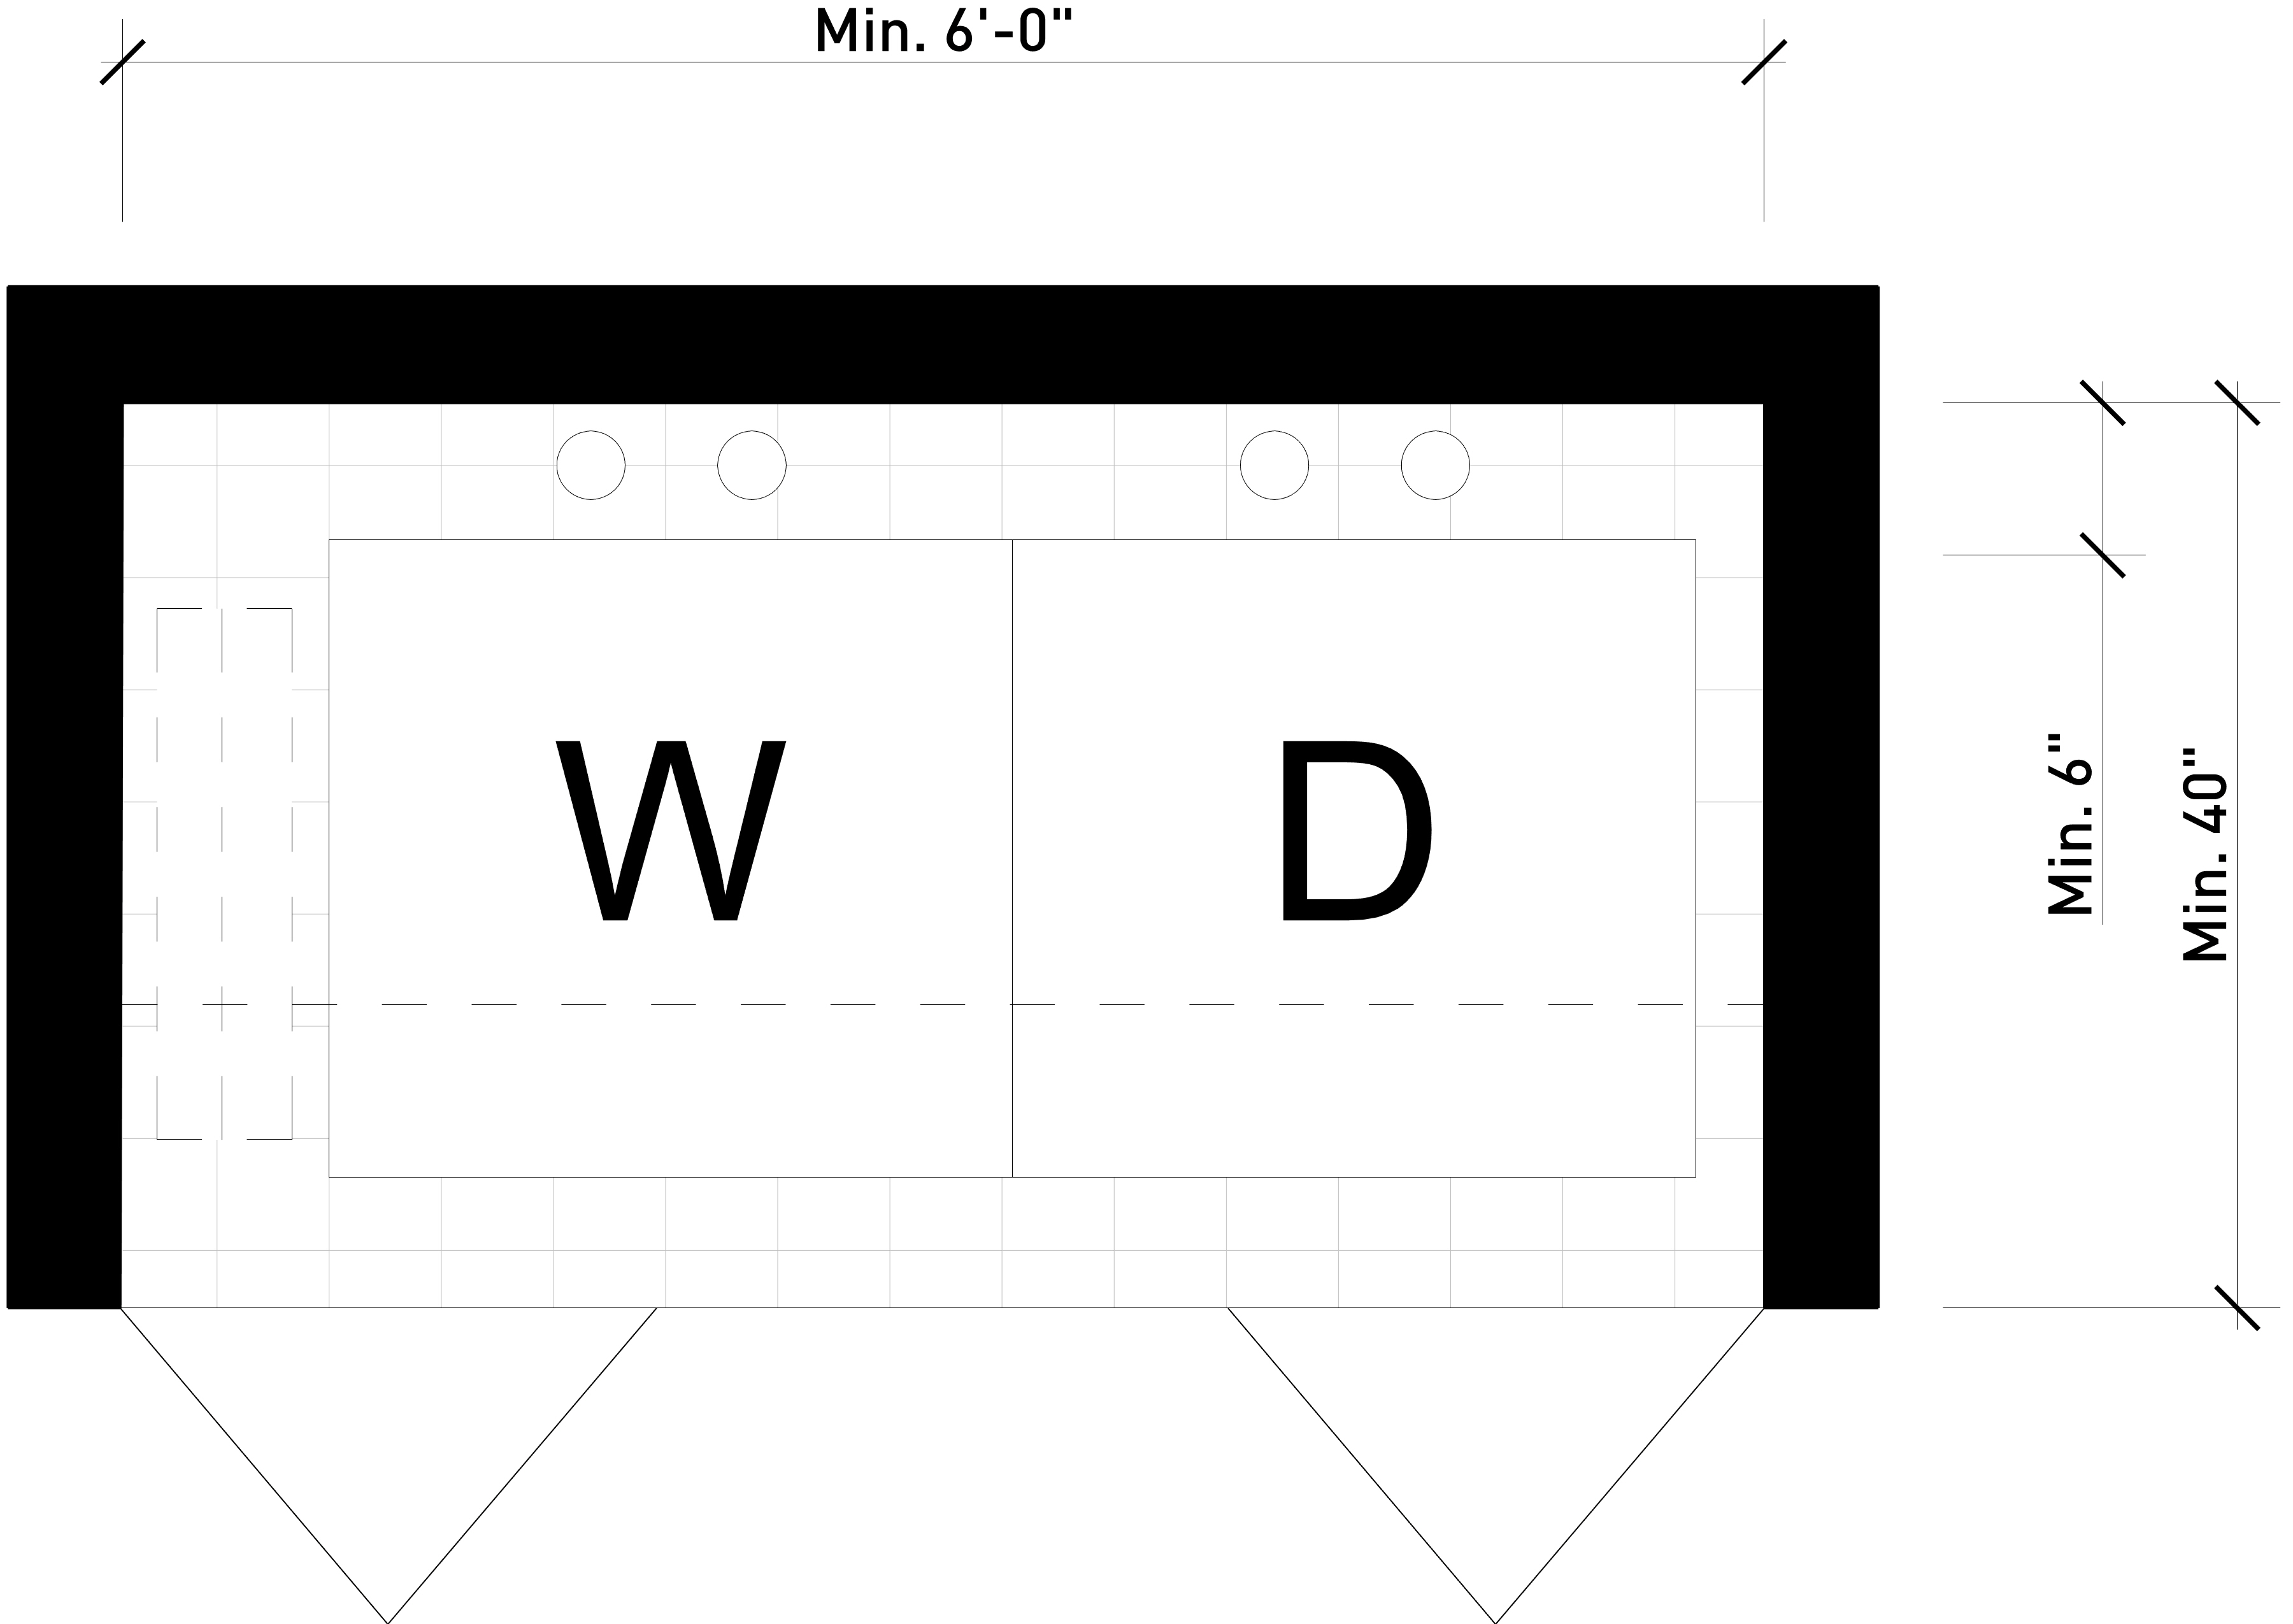
In-Unit Laundry

These laundry rooms are located within your unit, typically in a closet. Check out two common in-unit laundry configurations below and some tips and tricks for your design and installation.
Tips & Tricks:
Where should your laundry be located?
Locating your laundry room
If you have an existing laundry room, use it! Using existing locations or fixtures for plumbing within your multiplex will save you money and headaches.
Locating your plumbing
Where possible locate your plumbing fixtures (washers, sinks) at interior walls. Build this wall using 2x6 lumber so you can fit your pipes in it. If a layout works best on the exterior you will need to build an insulated partition inside, against the exterior wall so you can run the pipes in a cavity that won't freeze. Remove any existing lath and plaster and frame a 2x4 stud wall against the exterior to accommodate your new plumbing.
Appliances
Plan for plugs
Where you have appliances like washers and dryers, you need to allow room at the back for hookups and plugs. These can’t be pushed right against the wall. Check the appliance manuals to identify where these are and recommended spacing.
Size your appliances to your household’s needs
If you have a large family, or many individuals living together, consider getting a large washer and dryer to meet your cleaning needs.
Ventilation
Dryers need an exhaust to vent air to the outside. Refer to the manufacturer’s specifications for sizing dryer vents.
You can consider a ventless dryer but there is some maintenance associated with that type. However if getting a vent to the outside is too difficult, this is an option.
Inside your walls
Insulate unwanted sounds
Provide structural support for wall-hung items
Any heavy items hung off the wall such as shelves and cabinets need structural reinforcement behind them. Make sure to install blocking in areas where you plan to hang these heavy items.
Using acoustic insulation inside your walls if they are new will help reduce noise from the laundry and washing machine from being heard elsewhere in your unit.
Protect from mold and mildew
Use waterproof drywall or tile backer instead of standard drywall and mildew resistant paint.
Protect from mold and mildew
Use waterproof drywall or tile backer instead of standard drywall and mildew resistant paint.
Provide structural support for wall-hung items
Any heavy items hung off the wall such as shelves and cabinets need structural reinforcement behind them. Make sure to install blocking in areas where you plan to hang these heavy items.
Stacked Laundry
A stacked laundry setup is integrated within a closet, ideal for compact areas with limited floor space. This configuration includes a washer and dryer stacked on top of each other, effectively minimizing the required footprint.
What is included?
Appliances:
(1) Energy star washer
(1) Energy star dryer (vented to exterior)
(1) Energy star dryer (vented to exterior)
Accessories:
(1) Under-Machine Drip Tray
Electrical:
Provide Power Outlets per Manufacturer’s Standard (GFCI)
Lighting:
(1) Pot Light Centered in Room
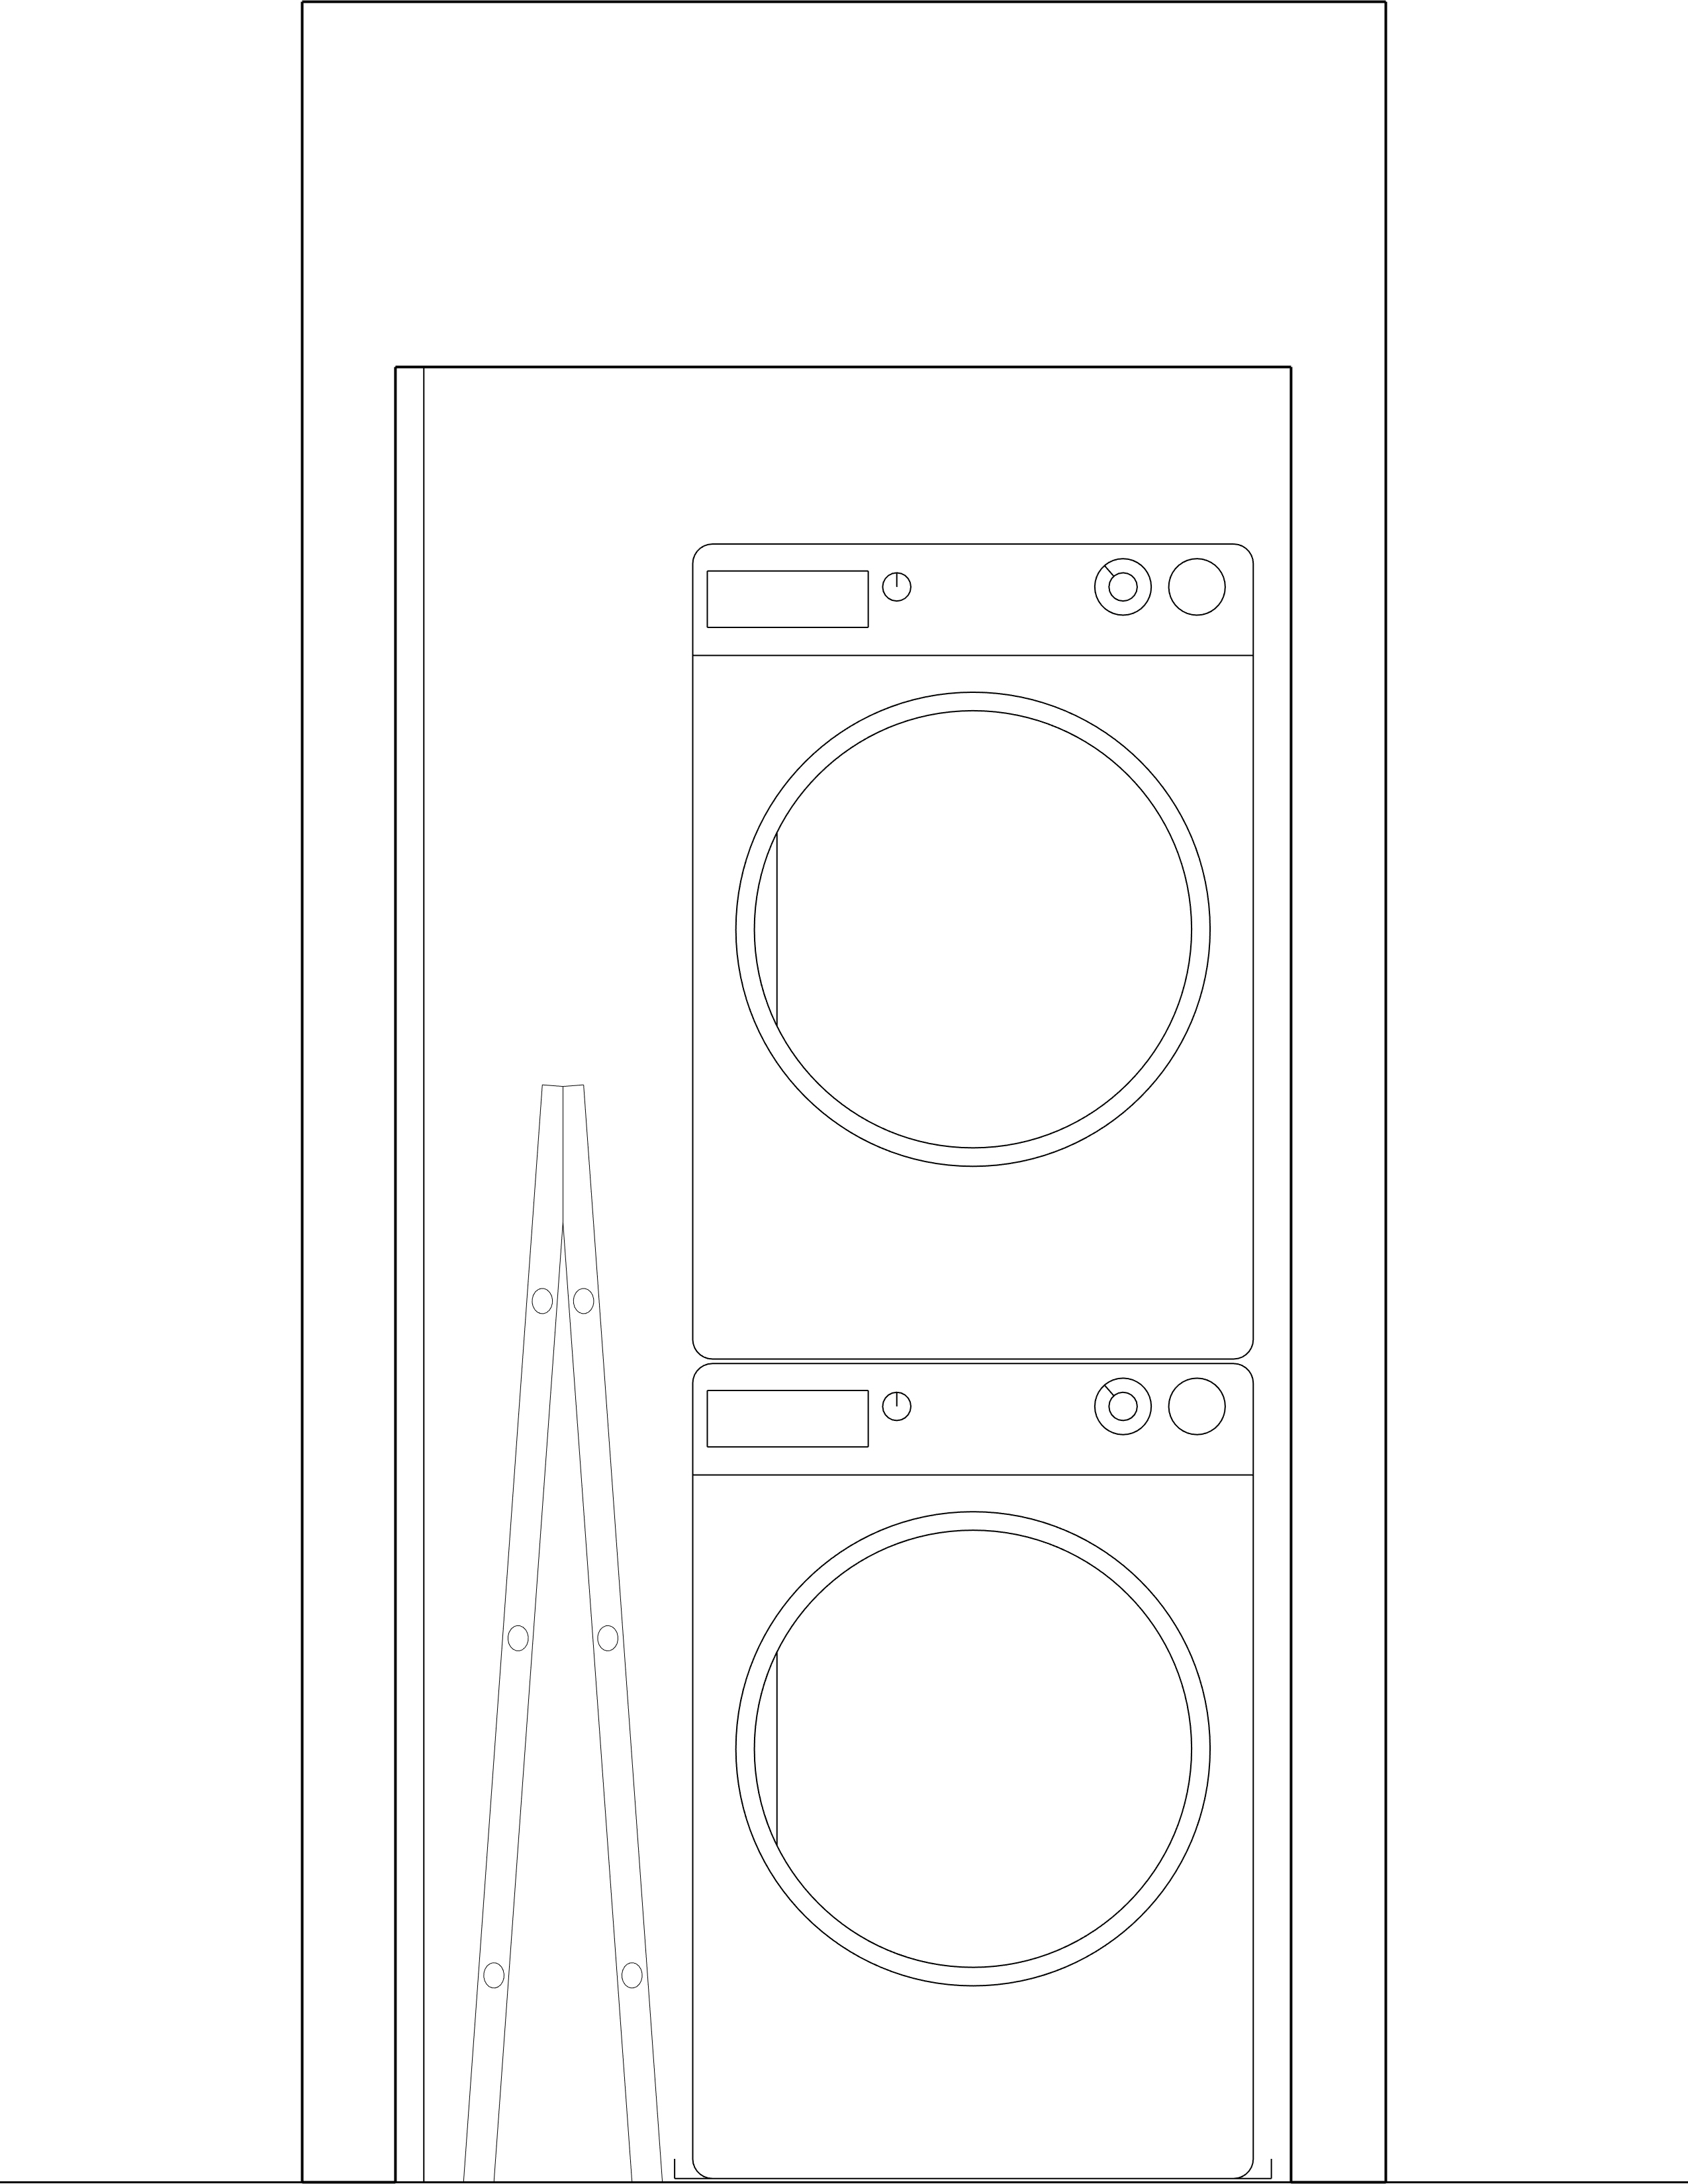
Front-facing elevation of a typical stacked laundry
Floor plan of a typical stacked laundry
Wall Construction:
(3) new basic partition walls
(1) water shutoff valve
(1-2) interior bi-fold door with trim
Finishes:
Floors: non-slip tile (11.7 sqft)
$10/sqft for supply and install of tile
Walls: waterproof drywall finished with mildew resistant paint
Finishes:
Floors: non-slip tile (11.7 sqft)
$10/sqft for supply and install of tile
Walls: waterproof drywall finished with mildew resistant paint
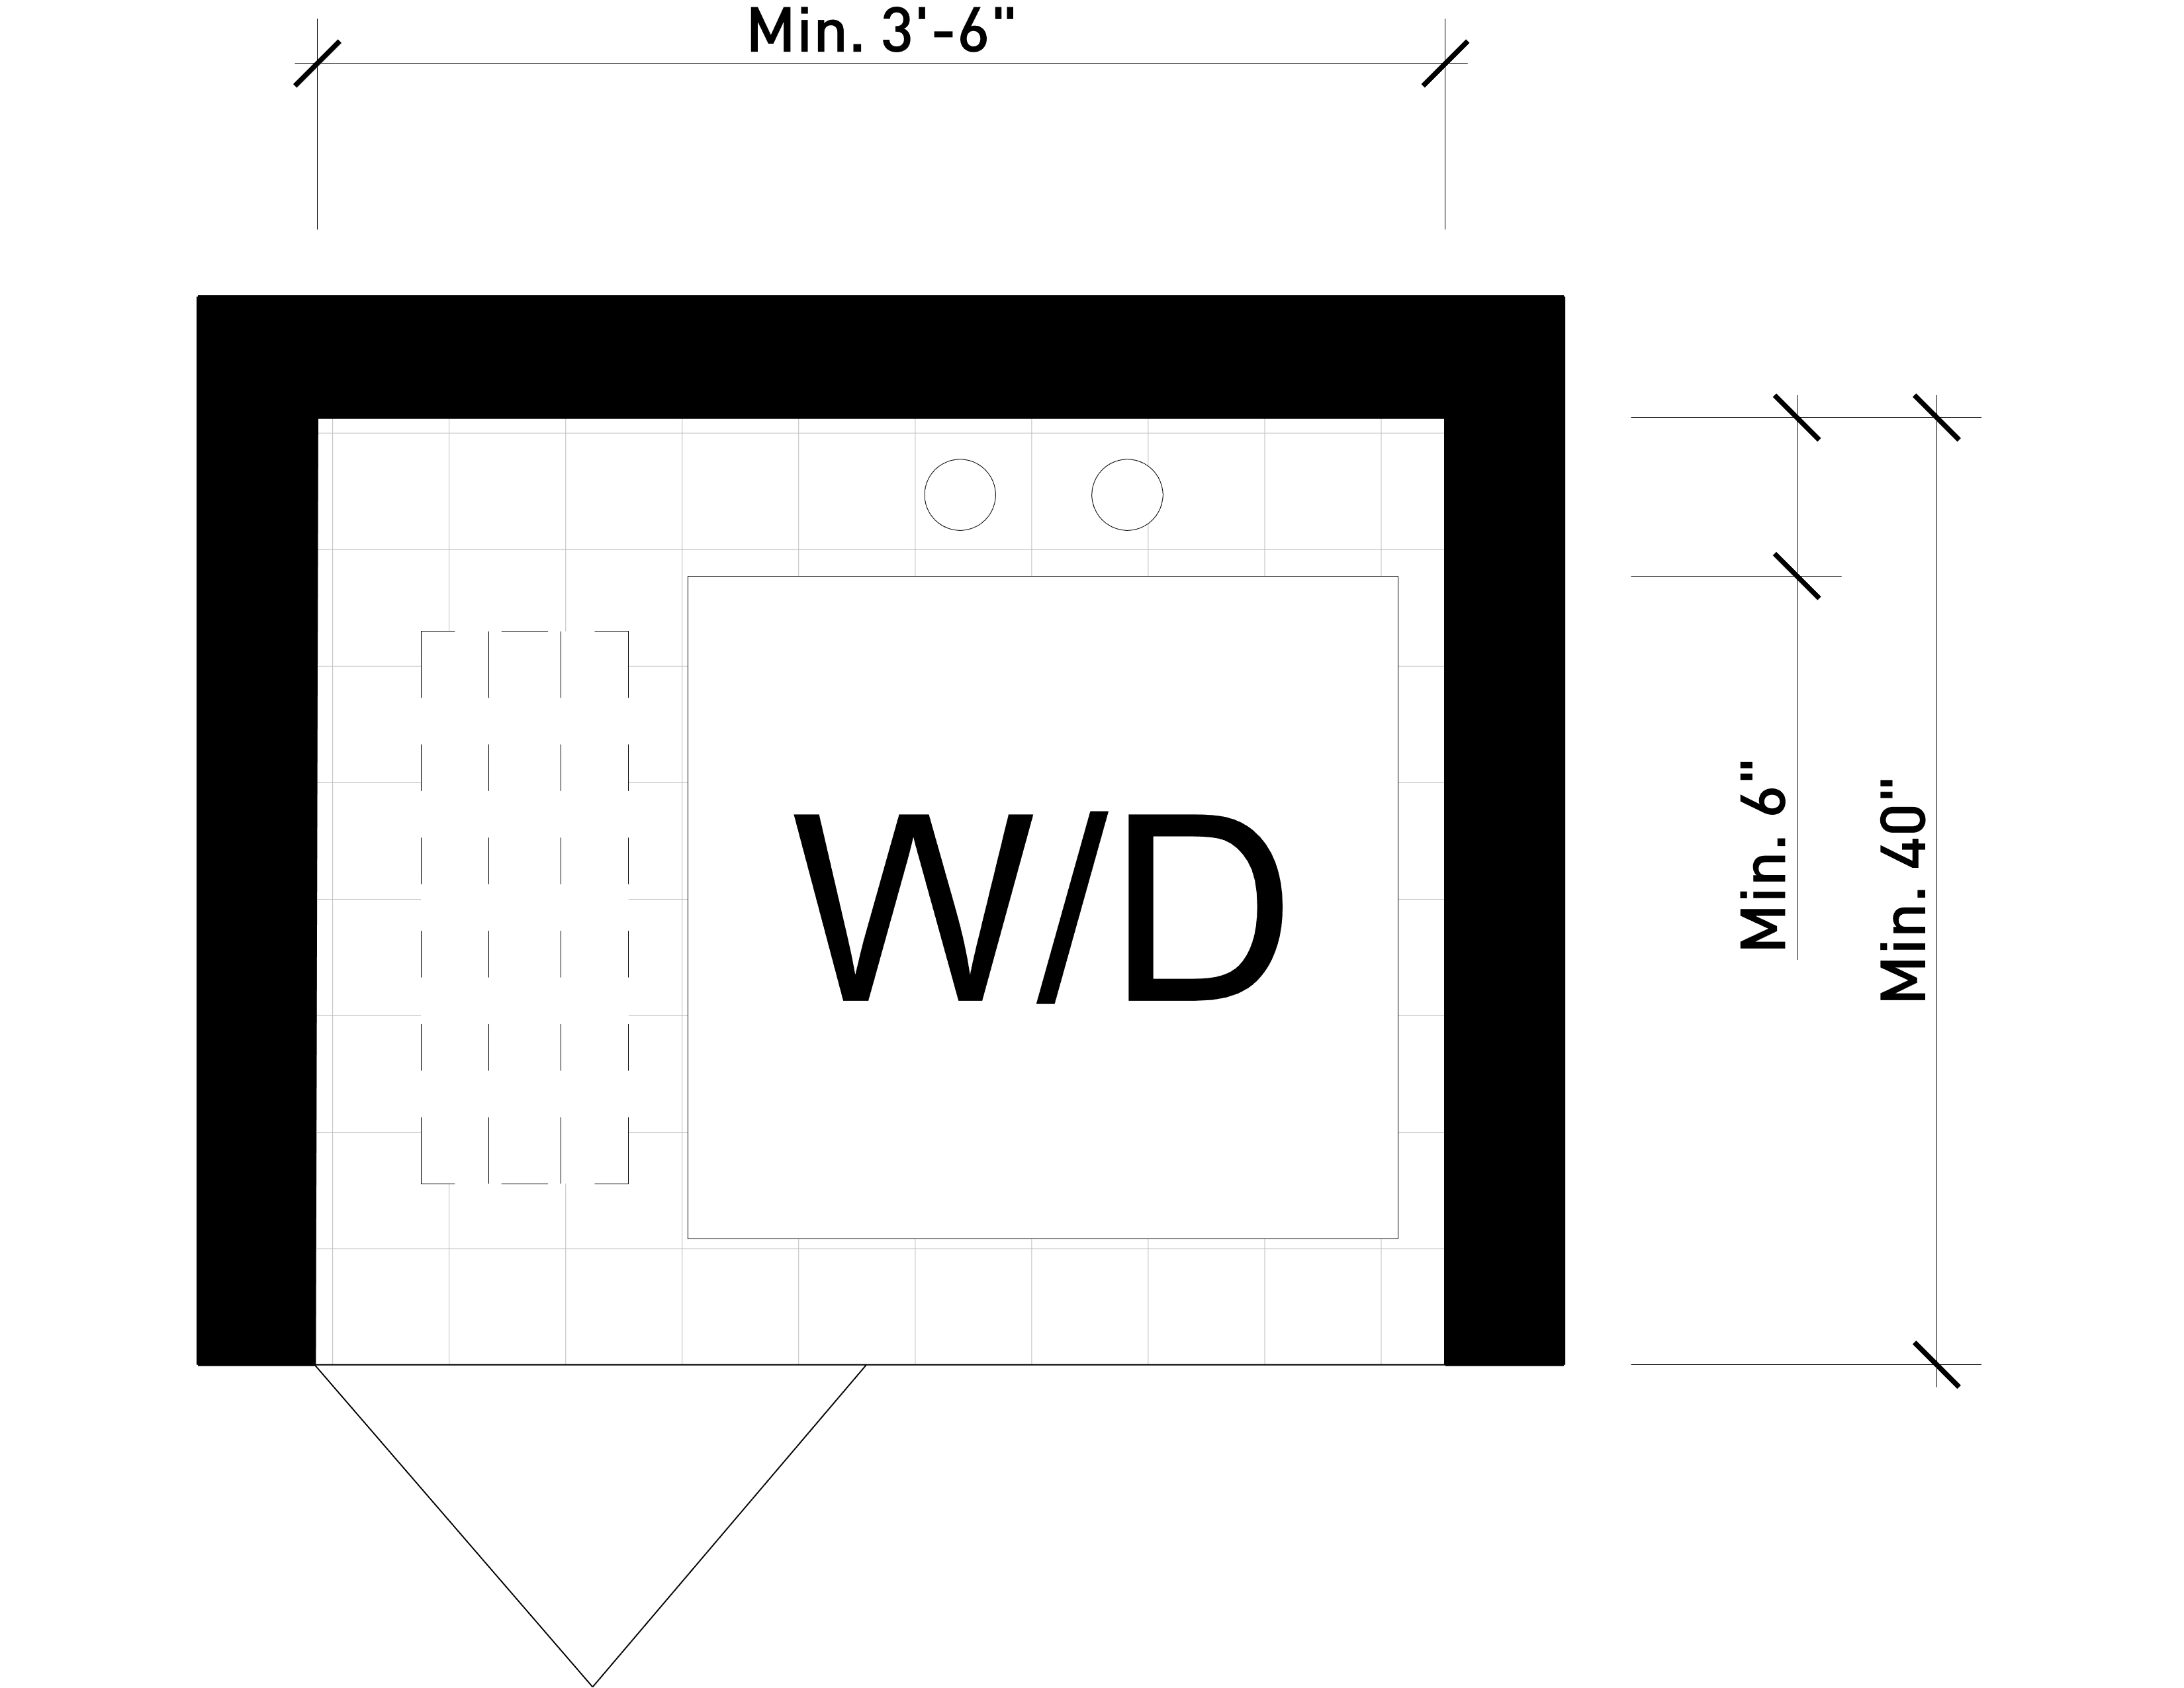
Side-by-Side Laundry
What is included?
Appliances:
(1) Energy star washer
(1) Energy star dryer (vented to exterior)
Accessories:(1) Energy star dryer (vented to exterior)
(1) Under-Machine Drip Tray
Electrical:
Provide Power Outlets per Manufacturer’s Standard (GFCI)
Lighting:
(1) Pot Light Centered in Room
Floor plan of a typical side-by-side laundry
Wall Construction:
(3) new basic partition walls
(1) Water Shutoff Valve
(1-2) interior bi-fold door with trim
Finishes:
Floors: non-slip tile 20 sqft
$10/sqft for supply and install of tile
Finishes:
Floors: non-slip tile 20 sqft
$10/sqft for supply and install of tile
Walls: waterproof drywall finished with mildew resistant paint
Bedroom

A bedroom is where you sleep at night. For a space to be legally considered a bedroom, it must adhere to safety, ventilation, and size standards, ensuring a comfortable living space. Discover more about the essential components of a proper bedroom below.
What’s included?
Wall Construction:
(2) New basic partition walls
Lighting:
(1) Pot Light Centered in Room
(1) Interior door with trim
(1) OBC compliant operable window
(1) OBC compliant operable window
Lighting:
(1) Pot Light Centered in Room
Finishes:
Walls finished with paint and basic baseboard / trim
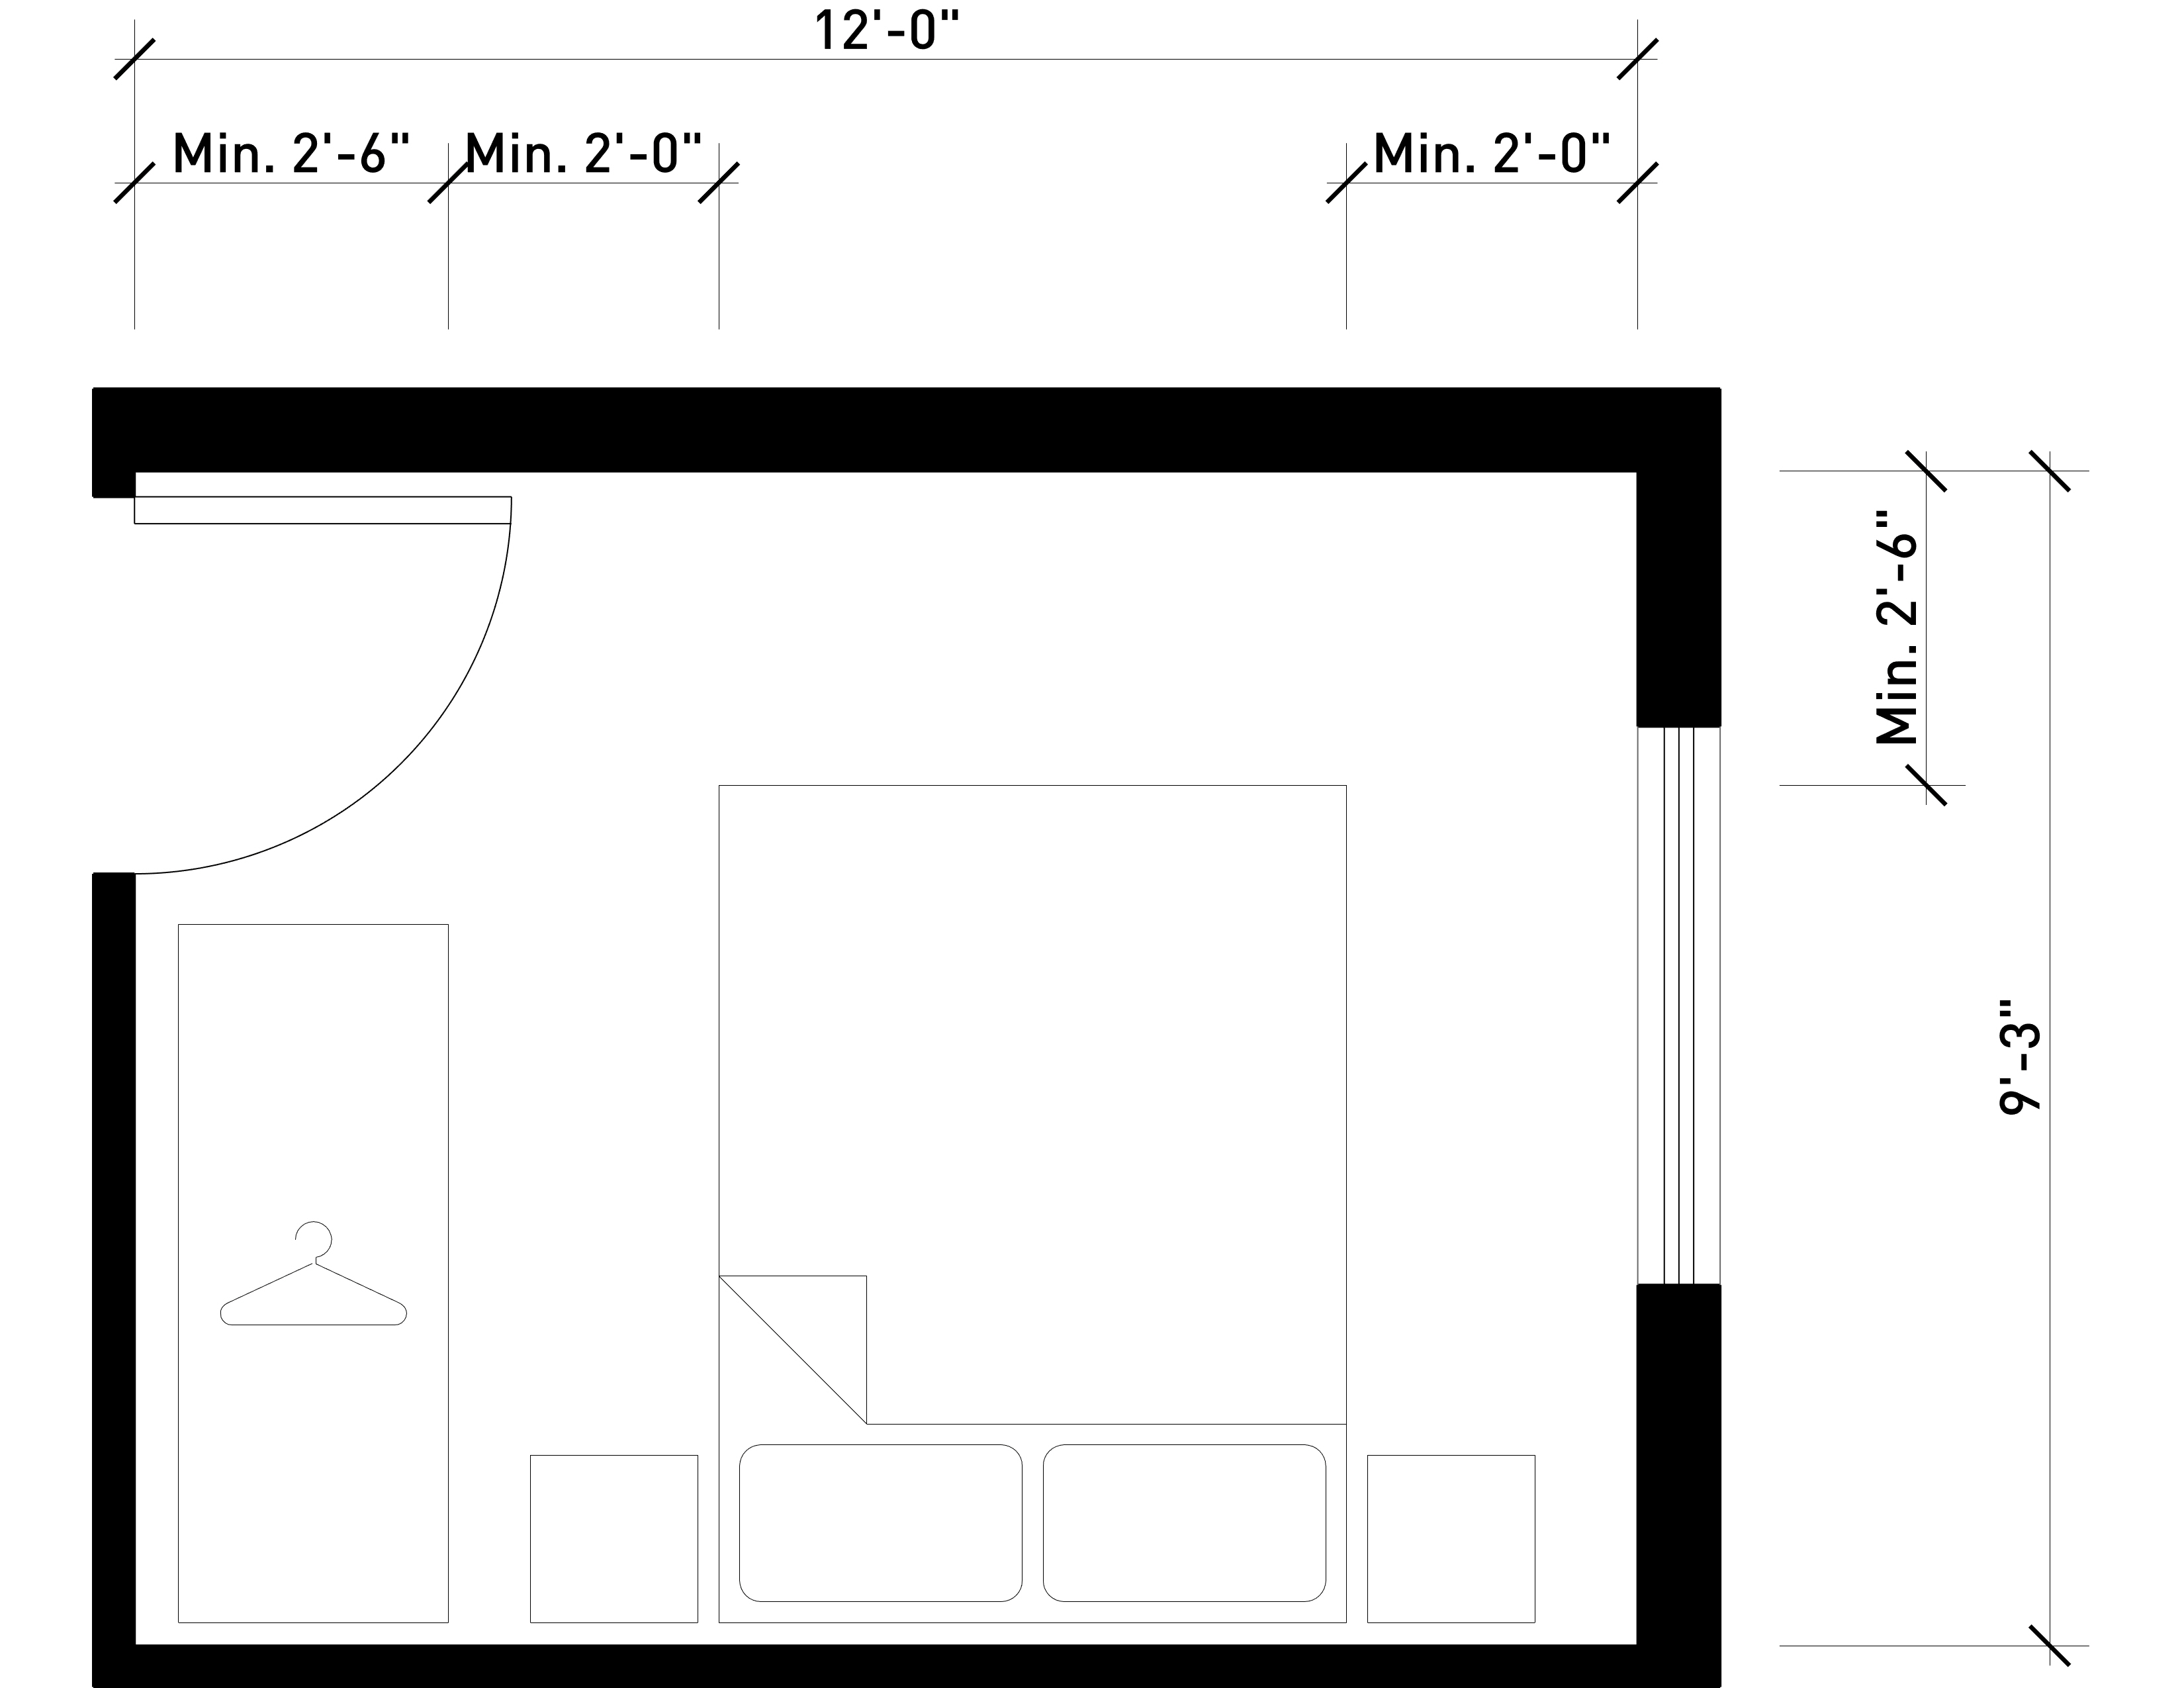
Floor plan of a typical bedroom
Tips & Tricks:
Space planning
Design for flexibility
Consider using a freestanding closet rather than a built-in one to allow for greater flexibility when moving around furniture.
Every bedroom must have a window
Every bedroom must have at least one window to the exterior to be a legal bedroom and provide occupants with a second means of egress. The Ontario Building Code (OBC) requires at least one of the windows in a bedroom to be easily opened from the inside. Generally to be considered an exit his window must provide an unobstructed open space greater than 0.35m2 with no dimensions less than 380mm. Verify requirements with your local authority.
Be aware of the size of beds
The size of your bed and its location will greatly determine where things can go in a bedroom. Depending on the type of bed you purchase, you may not have space in your bedroom to access it from all three sides.
The standard sizes of beds are:
Twin (38in x 75in)
Full (53in x 75in)
Queen (60in x 80in)
King (76in x 80in)
Plan for plugs
Make sure to provide enough outlets to provide power to your electronic devices and appliances such as televisions, digital clocks, radio, etc.
Make sure to provide enough outlets to provide power to your electronic devices and appliances such as televisions, digital clocks, radio, etc.
Closet

A closet is a storage area that helps keep things organized. It has shelves, rods, and compartments to hold clothes, shoes, and accessories, making your space tidy and efficient. Learn about the key components that create a well-organized and functional closet.
What’s included?
Wall Construction:
(2) Basic partition wall
(1) Set of bypass doors
(1) Wall mounted shelf (Home Depot grade)
Finish:
All exposed walls finished with paint and basic baseboards & trim
Wall Construction:
(2) Basic partition wall
(1) Set of bypass doors
(1) Wall mounted shelf (Home Depot grade)
Finish:
All exposed walls finished with paint and basic baseboards & trim

Floor plan of a typical closet
This website, including all data and information incorporated herein, is being provided for information purposes only and is not intended for and has not been approved for use for construction at any location. For certainty, The University of Toronto, John H. Daniels Faculty of Architecture Landscape and Design and LGA Architectural Partners provides no representation or warranty regarding any use of or reliance upon this website, including no representation or warranty that this website complies with applicable laws (including any applicable zoning by-laws or building code requirements) and no representation or warranty that any cost estimates included in or based upon this website have been validated by the applicable market. Any use of or reliance upon this website by any person for any purpose shall be at such person’s sole risk and The University of Toronto, John H. Daniels Faculty of Architecture Landscape and Design and LGA Architectural Partners shall have no liability or responsibility for any such use of or reliance upon this website by any person for any purpose. Prior to any use of or reliance upon this website by any person for any purpose, consultation with a professional architect duly licensed in the applicable jurisdiction is strongly recommended.